

How to Make any Website Shoppable
B
undefined or mostly null.
Search for a command to run...
undefined or mostly null.
I can now establish my internet store with confidence thanks to this. I wish to enjoy my family and release myself from the factory life.
The key to luring users to a website is delivering high-quality content, which this website does.
Hi, I stumbled across your post and am very interested @papa's freezeria
When searching for a uk.careersbooster.com review, be sure to read unbiased evaluations since even if someone doesn't like something about an essay writing service, they will certainly write it. As a result, they will not hesitate to update the review.
Hello Bolaji! I need a developer to help me integrate my Shopify store (geometricgoods.com) with Commerce Layer. Multi-currency is causing me problems (shopify payments are not available in me region). Theme 2.0 is what I use (Dawn). Can you help me with this or can you recommend a specialist I should contact?
Thanks
Hi Hryhorii Nimets, can you read this, and join our Slack community here, or request a demo so we can better understand your needs and recommend something?
In this series, I will share articles related to building international ecommerce shopping experiences with composable commerce using API-first tools like Commerce Layer.
Have you ever wanted to learn how to build an ecommerce website as a developer? Look no further! In this article, I’ll walk you through the process of building a sleek, modern, and user-friendly conference swag digital store using composable commerce...
I wrote this article in December 2023 for an interview screening task and thought to share it today while clearing my drafts for some new content prep, just in case it's still helpful to someone out t

Hey! I’m super excited to announce that I have joined the Secretariat Team at the Digital Public Goods Alliance. In this role, I leverage my passion for open source and technical background to assess DPG applications, provide technical support and ad...

Creative designs have become more important than ever in the software ecosystem today with many industries and end-consumers having several use cases that require them to offer design editing solutions to either designers or end-consumers. Every busi...

With the rise of artificial intelligence (AI) and large language models (LLMs), it has become easier to solve different human problems than ever before. Even consumers with little to no technical expertise can benefit from AI. Humans can now automate...

Some years ago, GitHub introduced the new Profile README feature that allowed GitHub users to pin a markdown file on their profile using a special repository named after their GitHub username. Since then, developers have used this file as a quick por...

Digital commerce has changed, and there is an increasing demand for faster and highly efficient solutions across multiple interaction channels. The rise of headless commerce allows for more creative flexibility, better performance, and efficient software development. Developers can now make any website shoppable, serve customers on several platforms using the same code and content with no interruption to the customer journey using tools like Commerce Layer. As an API-first and stack agnostic platform, Commerce Layer provides commerce APIs for inventory, orders, shopping carts, prices, promotions, shipments, customers, and more. Ecommerce businesses can integrate Commerce Layer to manage the transactional part of their sales channel alongside any architecture or tool of their choice (be it WordPress, Drupal, Headless... anything!) and serve their storefront on multiple presentation layers (desktop, mobile, wearable devices, IoT, etc.).
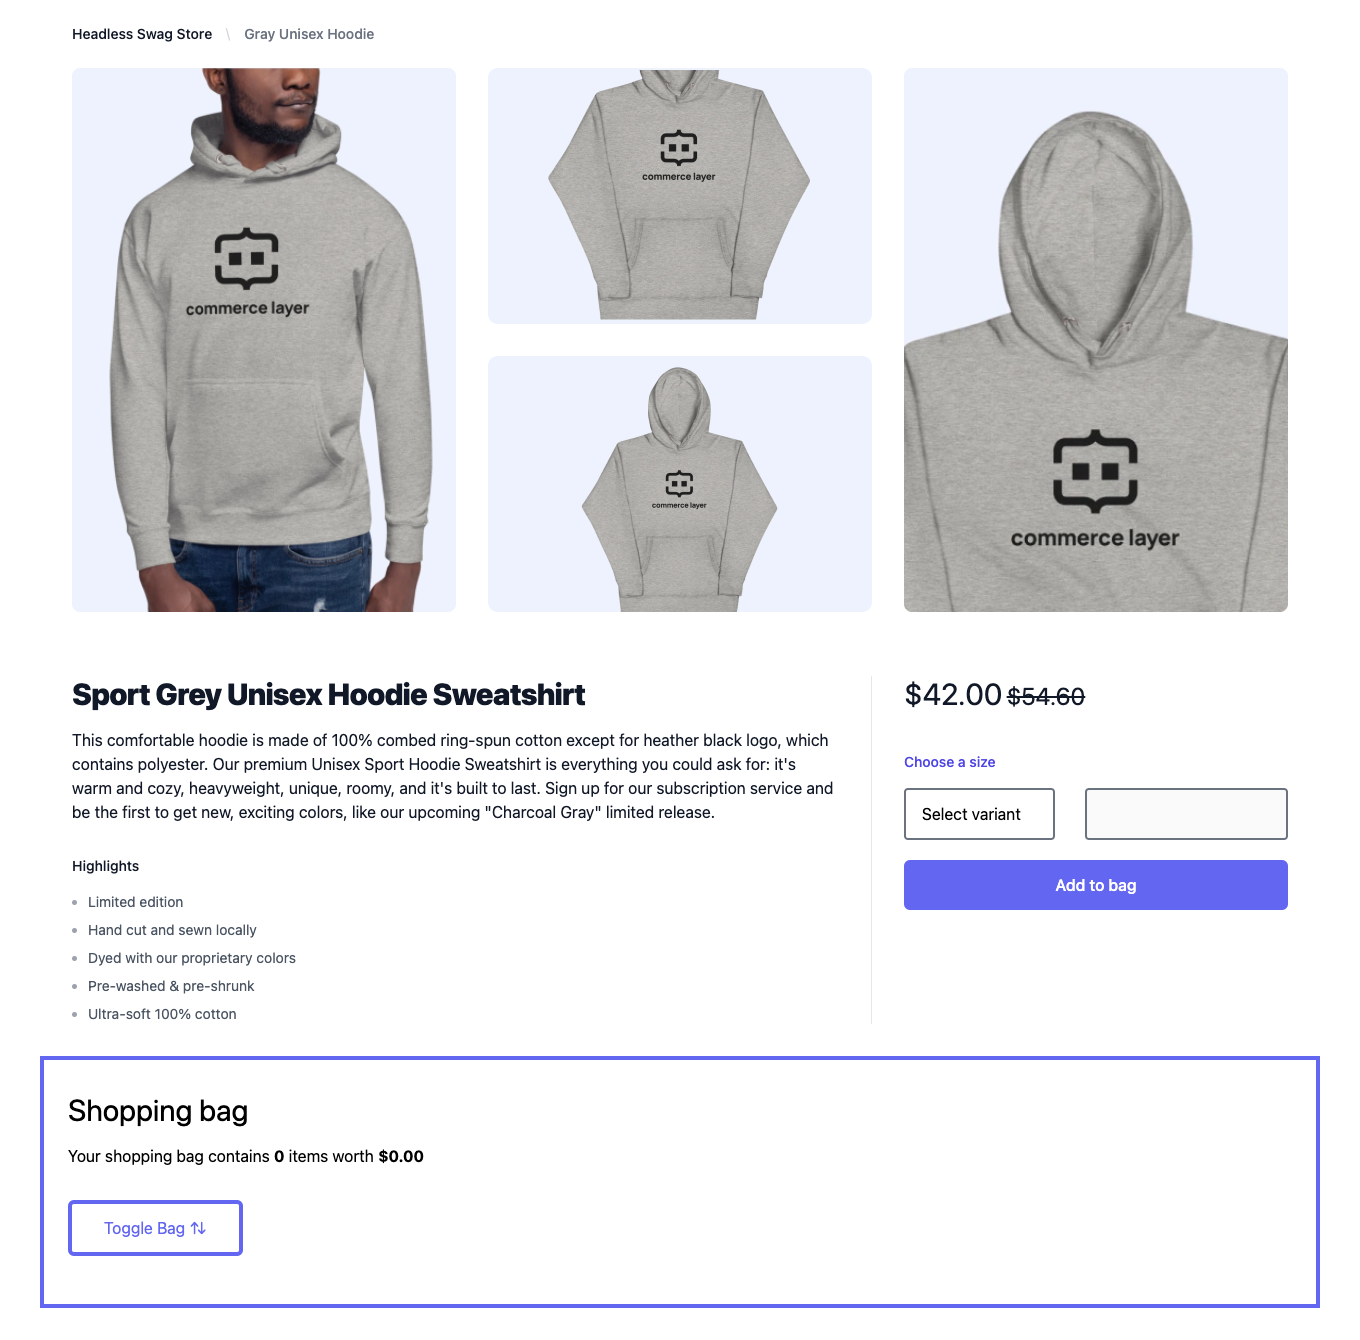
In this article, you'll practice the basics of headless commerce by building a simple ecommerce product page with static content, HTML5, and TailwindCSS as seen in the screenshot below. We will then integrate Commerce Layer to make the website shoppable using the Drop-in Javascript library and deploy the application to the cloud. The Drop-in library is a minimal way to get started with headless commerce and Commerce Layer, but if you're building for your business you can opt for a deeper integration using the Commerce Layer SDK.
Commerce Layer is a multi-market commerce API and order management system that lets you add global shopping capabilities to any website, mobile app, chatbot, wearable device, or IoT device, with ease. You can compose your stack with the best-of-breed tools you want and make any experience shoppable, anywhere, through a blazing-fast, enterprise-grade, and secure API.
The diagram below shows the relationships in an example stack for building a solid ecommerce web application using Commerce Layer and other composable tools.

Let's start by building the static website with HTML and TailwindCSS, all in a single index.html file. We will then integrate Commerce Layer using the Dropin library!
index.html file in the root directory./css directory with a custom.css file in it.You can create an account to get access to and integrate with Commerce Layer APIs following the steps below:
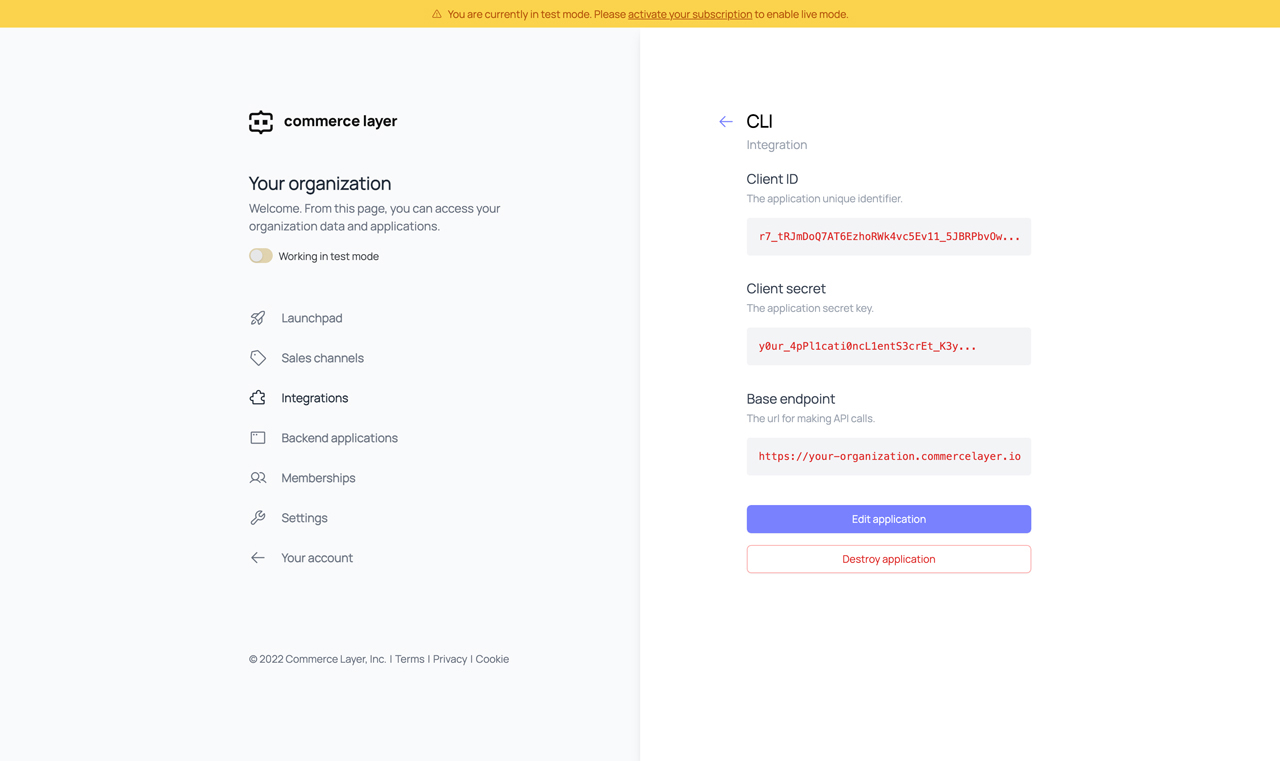
Website. Upon successful creation, you'll get a CLIENT ID and BASE ENDPOINT. Kindly remember to save that as we'll use it to interact with our application later.CLI and role: Admin. Upon successful creation, you'll get a CLIENT ID, CLIENT SECRET, and BASE ENDPOINT. Kindly remember to save that as we'll use it to interact with the CLI later.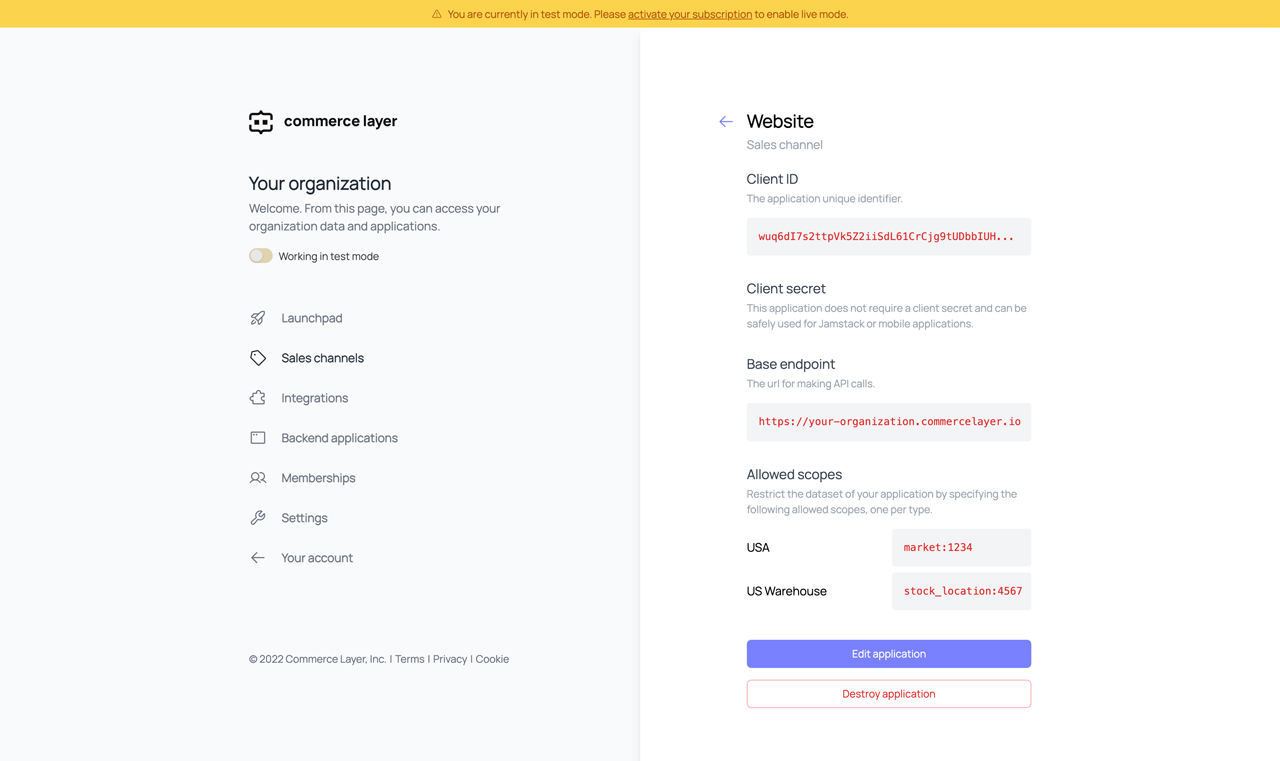
The Commerce Layer CLI helps you to manage your Commerce Layer applications right from the terminal. Installing the CLI provides access to the commercelayer command. You can set it up using the following steps:
//npm
npm install -g @commercelayer/cli

//yarn
yarn global add @commercelayer/cli
commercelayer applications:login -o <organizationSlug> -i <clientId> -s <clientSecret> -a <applicationAlias>
You will do the above for both applications (sales_channel and integration). The login command adds the application and sets it as the current one in session. You should log into the sales_channel first, and then the integration. This way, you'll have the integration as the current app (which is required by the seeder).
As we mentioned earlier, you can seed your organization with a merchant, a set of markets, products (SKUs), related prices, shipping methods, inventory, etc. via the CLI.
commercelayer plugins:install seeder
commercelayer seed
The CLI will use Commerce Layer's default seed data to populate your organization with a set of products (SKUs), related prices, and inventory information.
Now let's build our product page in a single index.html file which will contain the markup for product details, prices, available variants, available quantity, item availability, shopping bag, and checkout. You can find the full code on GitHub. In this tutorial, we will only highlight the important HTML elements and related data attributes we need for dynamic data. We will replace all style classes with the dummy content [...] so you can focus on the utility classes required to interact with the Drop-in library.
We will be using some data attributes to store extra information that doesn't have any visual representation like data-sku-code to store the SKU code of an item or data-add-to-bag-id to add a selected variant to the shopping bag when the "Add to bag" button is clicked. The Dropin library requires some data attributes to add dynamic data to a static web page. With this mechanism, you're building ecommerce with almost no code required (just HTML tags). Now let's proceed!
You should add some content to the page, such as product names, descriptions, reviews and images, and more. This content can be created with any CMS and rendered with any language. For this tutorial we're using just plain HTML.
<!DOCTYPE html>
<html>
   <head>
      <!-- Static content -->
      <title>Headless Swag Store</title>
      <link
          href="https://unpkg.com/tailwindcss@^2/dist/tailwind.min.css"
          rel="stylesheet"
        /><div class="mt-10">
                <div class="flex items-center justify-between">
                  <h3 class="text-sm text-indigo-600 font-medium">
                    Choose a size
                  </h3>
                </div>

                <div class="mt-4 flex -mx-2">
                  <div class="flex-1 px-2">
                    <select
                      name="variant"
                      class="clayer-variant-select block appearance-none border-2 border-gray-500 text-base-700 py-3 px-4 pr-8 rounded"
                      data-sku-reference="SWEETHMUB7B7B7000000"
                      data-price-container-id="price"
                      data-availability-message-container-id="availability-message"
                      data-add-to-bag-id="add-to-bag"
                      data-add-to-bag-quantity-id="add-to-bag-quantity"
                    >
                      <option value="" disabled selected>Select variant</option>
                      <option
                        class="clayer-variant"
                        data-sku-code="SWEETHMUB7B7B7000000SXXX"
                        data-sku-name="Sport Grey Unisex Hoodie Sweatshirt with Black Logo (S)"
                        data-sku-image-url="https://img.commercelayer.io/skus/SWEETHMUB7B7B7000000.png?fm=jpg&q=90"
                      >
                        Small
                      </option>
                      <option
                        class="clayer-variant"
                        data-sku-code="SWEETHMUB7B7B7000000MXXX"
                        data-sku-name="Sport Grey Unisex Hoodie Sweatshirt with Black Logo (M)"
                        data-sku-image-url="https://img.commercelayer.io/skus/SWEETHMUB7B7B7000000.png?fm=jpg&q=90"
                      >
                        Medium
                      </option>
                      <option
                        class="clayer-variant"
                        data-sku-code="SWEETHMUB7B7B7000000LXXX"
                        data-sku-name="Sport Grey Unisex Hoodie Sweatshirt with Black Logo (L)"
                        data-sku-image-url="https://img.commercelayer.io/skus/SWEETHMUB7B7B7000000.png?fm=jpg&q=90"
                      >
                        Large
                      </option>
                      <option
                        class="clayer-variant"
                        data-sku-code="SWEETHMUB7B7B7000000XLXX"
                        data-sku-name="Sport Grey Unisex Hoodie Sweatshirt with Black Logo (XL)"
                        data-sku-image-url="https://img.commercelayer.io/skus/SWEETHMUB7B7B7000000.png?fm=jpg&q=90"
                      >
                        Extra Large
                      </option>
                    </select>
                  </div>
                  <!-- Add to bag quantity -->
                  <div class="flex-1 px-2">
                    <label for="add-to-bag-quantity" class="sr-only"
                      >Add to bag quantity</label
                    >
                    <input
                      id="add-to-bag-quantity"
                      type="number"
                      min="1"
                      class="clayer-add-to-bag-quantity block appearance-none border-2 border-gray-500 text-base-700 py-3 px-4 pr-2 rounded"
                    />
                  </div>
                </div>
              </div>
      <link
          rel="icon"
          href="https://data.commercelayer.app/assets/images/favicons/favicon.ico"
      />
     </head>
   <body>
      <!-- Static content -->

      <!-- Image gallery -->
      <div class="mt-6 max-w-2xl mx-auto sm:px-6 lg:max-w-7xl lg:px-8 lg:grid lg:grid-cols-3 lg:gap-x-8">
         <div class="hidden aspect-w-3 aspect-h-4 rounded-lg overflow-hidden lg:block" >
            <img
               src="./assets/img/01.png"
               alt="Model wearing the gray men hoodie"
               class="w-full h-full object-center object-cover"
               />
         </div>
         <div class="hidden lg:grid lg:grid-cols-1 lg:gap-y-8">
            <div class="aspect-w-3 aspect-h-2 rounded-lg overflow-hidden">
               <img
                  src="./assets/img/02.png"
                  alt="The gray men hoodie"
                  class="w-full h-full object-center object-cover"
                  />
            </div>
            <div class="aspect-w-3 aspect-h-2 rounded-lg overflow-hidden">
               <img
                  src="./assets/img/03.png"
                  alt="The gray men hoodie"
                  class="w-full h-full object-center object-cover"
                  />
            </div>
         </div>
         <div class="aspect-w-4 aspect-h-5 sm:rounded-lg sm:overflow-hidden lg:aspect-w-3 lg:aspect-h-4" >
            <img
               src="./assets/img/04.png"
               alt="The gray men hoodie"
               class="w-full h-full object-center object-cover"
               />
         </div>
      </div>

      <!-- Product info -->
      <div class="max-w-2xl mx-auto pt-10 pb-8 px-4 sm:px-6 lg:max-w-7xl lg:pt-16 lg:px-8 lg:grid lg:grid-cols-3 lg:grid-rows-[auto,auto,1fr] lg:gap-x-8" >
      <div class="lg:col-span-2 lg:border-r lg:border-gray-200 lg:pr-8">
         <h1 class="text-2xl font-extrabold tracking-tight text-gray-900 sm:text-3xl" >
            Sport Grey Unisex Hoodie Sweatshirt
         </h1>

         <!-- Description and details -->
         <div class="py-4">
            <h3 class="sr-only">Description</h3>
            <div class="space-y-6">
               <p class="text-base text-gray-900">
                  This comfortable hoodie is made of 100% combed ring-spun
                  cotton except for heather black logo, which contains
                  polyester. Our premium Unisex Sport Hoodie Sweatshirt is
                  everything you could ask for: it's warm and cozy,
                  heavyweight, unique, roomy, and it's built to last. Sign up
                  for our subscription service and be the first to get new,
                  exciting colors, like our upcoming "Charcoal Gray" limited
                  release.
               </p>
            </div>
         </div>
      </div>
   </body>
</html>
Add the code below to <body> section of the index.html file just before the </body> tag and add the required publishable configuration data.
<!-- Config -->
<div
  id="clayer-config"
  data-base-url="<yourOrganizationUrl>"
  data-cache="true"
  data-client-id="<yourClientId>"
  data-market-id="<yourMarketId>"
  data-country-code="US"
  data-language-code="en"
  data-cart-url="<https://example.com/cart>"
  data-return-url="<https://example.com/return>"
  data-privacy-url="<https://example.com/privacy>"
  data-terms-url="<https://example.com/terms>"
  data-dev-settings-debug="true"
  data-dev-settings-console="true"
  data-dev-settings-trace="true"
></div>

<!-- JS Library -->
<script
  type="text/javascript"
  src="<https://cdn.jsdelivr.net/npm/@commercelayer/js-dropin@1.5.12/lib/index.js>">
</script>
clayer-config — stores all the data attributes with your credentials and page preferences.data-base-url — stores your organization base endpoint as defined on Commerce Layer (something like https://yourdomain.commercelayer.io).data-client-id — stores your sales channel application's client ID.data-market-id stores the number of the market you want to work on as defined in Commerce Layer.data-country-code — stores the country code of the country assigned to an order (e.g US)data-language-code — stores the language assigned to an order (e.g en-US).data-cart-url, data-return-url, data-privacy-url, data-terms-url — store the links to external pages that Commerce Layer should redirect your user to upon certain requests (we don't need these for this tutorial, so we'll add some dummy links).Add the markup below to fetch the selling price (amount) and original price (compare-at-amount) of an SKU. You should add an element with clayer-price class and data-sku-code data attribute wherever you want to show a product price. The child element with class amount gets populated with the price that has been defined in Commerce Layer for that SKU code (for the market defined in the configuration step above). The child element with class compare-at-amount gets populated only if compare-at-amount is defined and is higher than the amount. The price ID is used to match the data-price-container-id in the variant options (as seen in the next section).
<!DOCTYPE html>
<html>
   <head>
      <!-- Static content [...] -->
   </head>
   <body>
      <!-- Static content [...] -->

      <!-- Price -->
      <div class="...">
      <h2 class="...">Product information</h2>
      <div
         class="... clayer-price"
         id="price"
         data-sku-code="SWEETHMUB7B7B7000000XLXX"
         >
         <span class="... amount"></span>
         <span class="... compare-at-amount"></span>
      </div>

      <!-- Config [...] -->

      <!-- JS Library [...] -->
   </body>
</html>
If your product has many variants, add an element with clayer-variant class and data-sku-code data attribute for each variant option. This will fetch the SKU for each variant from Commerce Layer. You can use either a select tag or a list of radio buttons (appending the class clayer-variant-select or clayer-variant-radio respectively). You can also add other data attributes that will be used in the shopping bag based on a user's variant selection such as:
data-sku-name — the name of the selected SKU to be displayed in the shopping bag.data-sku-reference — the reference of the selected SKU to be displayed in the shopping bag.data-sku-image-url — the URL to an image of the SKU to be displayed in the shopping bag.data-price-container-id — the ID of the DOM element that contains the price for this SKU, in the current market (potentially different variants can have different prices; when selecting a new variant, the price will be updated accordingly).data-availability-message-container-id — the ID of the DOM element that contains the availability message for this SKU, in the current market (more on this later).data-add-to-bag-id: the ID of the "Add to bag" DOM element (when clicking the "Add to bag" button with the specified ID, the selected variant will be added to bag).data-add-to-bag-quantity-id — the ID of the "Add to bag quantity" DOM element (when clicking the "Add to bag" button with the specified ID, the selected quantity of the variant will be added to bag).<!DOCTYPE html>
<html>
<head>
<!-- Static content [...] -->
</head>
<body>
<!-- Static content [...] -->
<!-- Price [...] -->
<!-- Variants (select sizes) -->
<div class="...">
<div class="...">
<h3 class="...">Choose a size</h3>
</div>
<div class="mt-4 flex -mx-2">
<div class="flex-1 px-2">
<select
name="variant"
class="clayer-variant-select ..."
data-sku-reference="SWEETHMUB7B7B7000000"
data-price-container-id="price"
data-availability-message-container-id="availability-message"
data-add-to-bag-id="add-to-bag"
data-add-to-bag-quantity-id="add-to-bag-quantity"
>
<option value="" disabled selected>Select variant</option>
<option
class="clayer-variant"
data-sku-code="SWEETHMUB7B7B7000000SXXX"
data-sku-name="Sport Grey Unisex Hoodie Sweatshirt with Black Logo (S)"
data-sku-image-url="https://img.commercelayer.io/skus/SWEETHMUB7B7B7000000.png?fm=jpg&q=90"
>Small
</option>
<option
class="clayer-variant"
data-sku-code="SWEETHMUB7B7B7000000MXXX"
data-sku-name="Sport Grey Unisex Hoodie Sweatshirt with Black Logo (M)"
data-sku-image-url="https://img.commercelayer.io/skus/SWEETHMUB7B7B7000000.png?fm=jpg&q=90"
>Medium
</option>
<option
class="clayer-variant"
data-sku-code="SWEETHMUB7B7B7000000LXXX"
data-sku-name="Sport Grey Unisex Hoodie Sweatshirt with Black Logo (L)"
data-sku-image-url="https://img.commercelayer.io/skus/SWEETHMUB7B7B7000000.png?fm=jpg&q=90"
>Large
</option>
<option
class="clayer-variant"
data-sku-code="SWEETHMUB7B7B7000000XLXX"
data-sku-name="Sport Grey Unisex Hoodie Sweatshirt with Black Logo (XL)"
data-sku-image-url="https://img.commercelayer.io/skus/SWEETHMUB7B7B7000000.png?fm=jpg&q=90"
>Extra Large
</option>
</select>
</div>
</div>
</div>
<!-- Other variant input elements [...] -->
<!-- Config [...] -->
<!-- JS Library [...] -->
</body>
When an option (variant) is selected and the "Add to bag" button is clicked, the selected variant is added to the shopping bag using the clayer-add-to-bag class and ID that matches the variants' data-add-to-bag-id. You can also optionally add a quantity field to let the customer add more than one item to the shopping bag using the clayer-add-to-bag-quantity attribute.
<!DOCTYPE html>
<html>
   <head>
      <!-- Static content [...] -->
   </head>
   <body>
      <!-- Static content [...] -->

      <!-- Price  [...] -->

      <!-- Variants (select sizes) -->

      <!-- Add to bag quantity -->
      <div class="...">
          <label for="add-to-bag-quantity" class="...">Add to bag quantity</label>
        <input
              id="add-to-bag-quantity"
              type="number"
              min="1"
              class="clayer-add-to-bag-quantity ..."
        />
      </div>

      <!-- Add to bag button -->
      <a
         href="#"
         class="clayer-add-to-bag ..."
         id="add-to-bag"
         data-availability-message-container-id="availability-message"
         >
      Add to bag
      </a>

      <!-- Config [...] -->

      <!-- JS Library [...] -->
   </body>
</html>
Add an element with clayer-availability-message-available-template ID as the template tag to be displayed when the selected SKU is available. All the child elements will be populated with the delivery lead time and shipping method information related to the selected variant.
Add an element with clayer-availability-message-unavailable-template ID as the template tag to be displayed when the selected SKU is not available. This element will be appended to a specific container when customers will try to add an SKU to the shopping bag and that SKU’s stock item has a quantity of zero or doesn’t exist at all. If you try to create a line item, you will get an "out of stock" error. The clayer-availability-message-unavailable-template is used to store an "out of stock" message.
<!DOCTYPE html>
<html>
   <head>
      <!-- Static content [...] -->
   </head>
   <body>
      <!-- Static content [...] -->

      <!-- Price  [...] -->

      <!-- Variants (select sizes) -->

      <!-- Add to bag quantity -->

      <!-- Availability message templates -->
      <div
         class="... clayer-availability-message-container"
         id="availability-message"
         ></div>
      <template id="clayer-availability-message-available-template">
         <p class="...">
            Available in
            <span class="clayer-availability-message-available-min-days"></span>
            -
            <span class="clayer-availability-message-available-max-days"></span>
            days with
            <span class="clayer-availability-message-available-shipping-method-name"></span>
            (<span class="clayer-availability-message-available-shipping-method-price"></span>)
         </p>
      </template>
      <template id="clayer-availability-message-unavailable-template">
         <p class="...">The selected SKU is not available.</p>
      </template>
      </div>
      </div>

      <!-- Config [...] -->

      <!-- JS Library [...] -->
   </body>
</html>
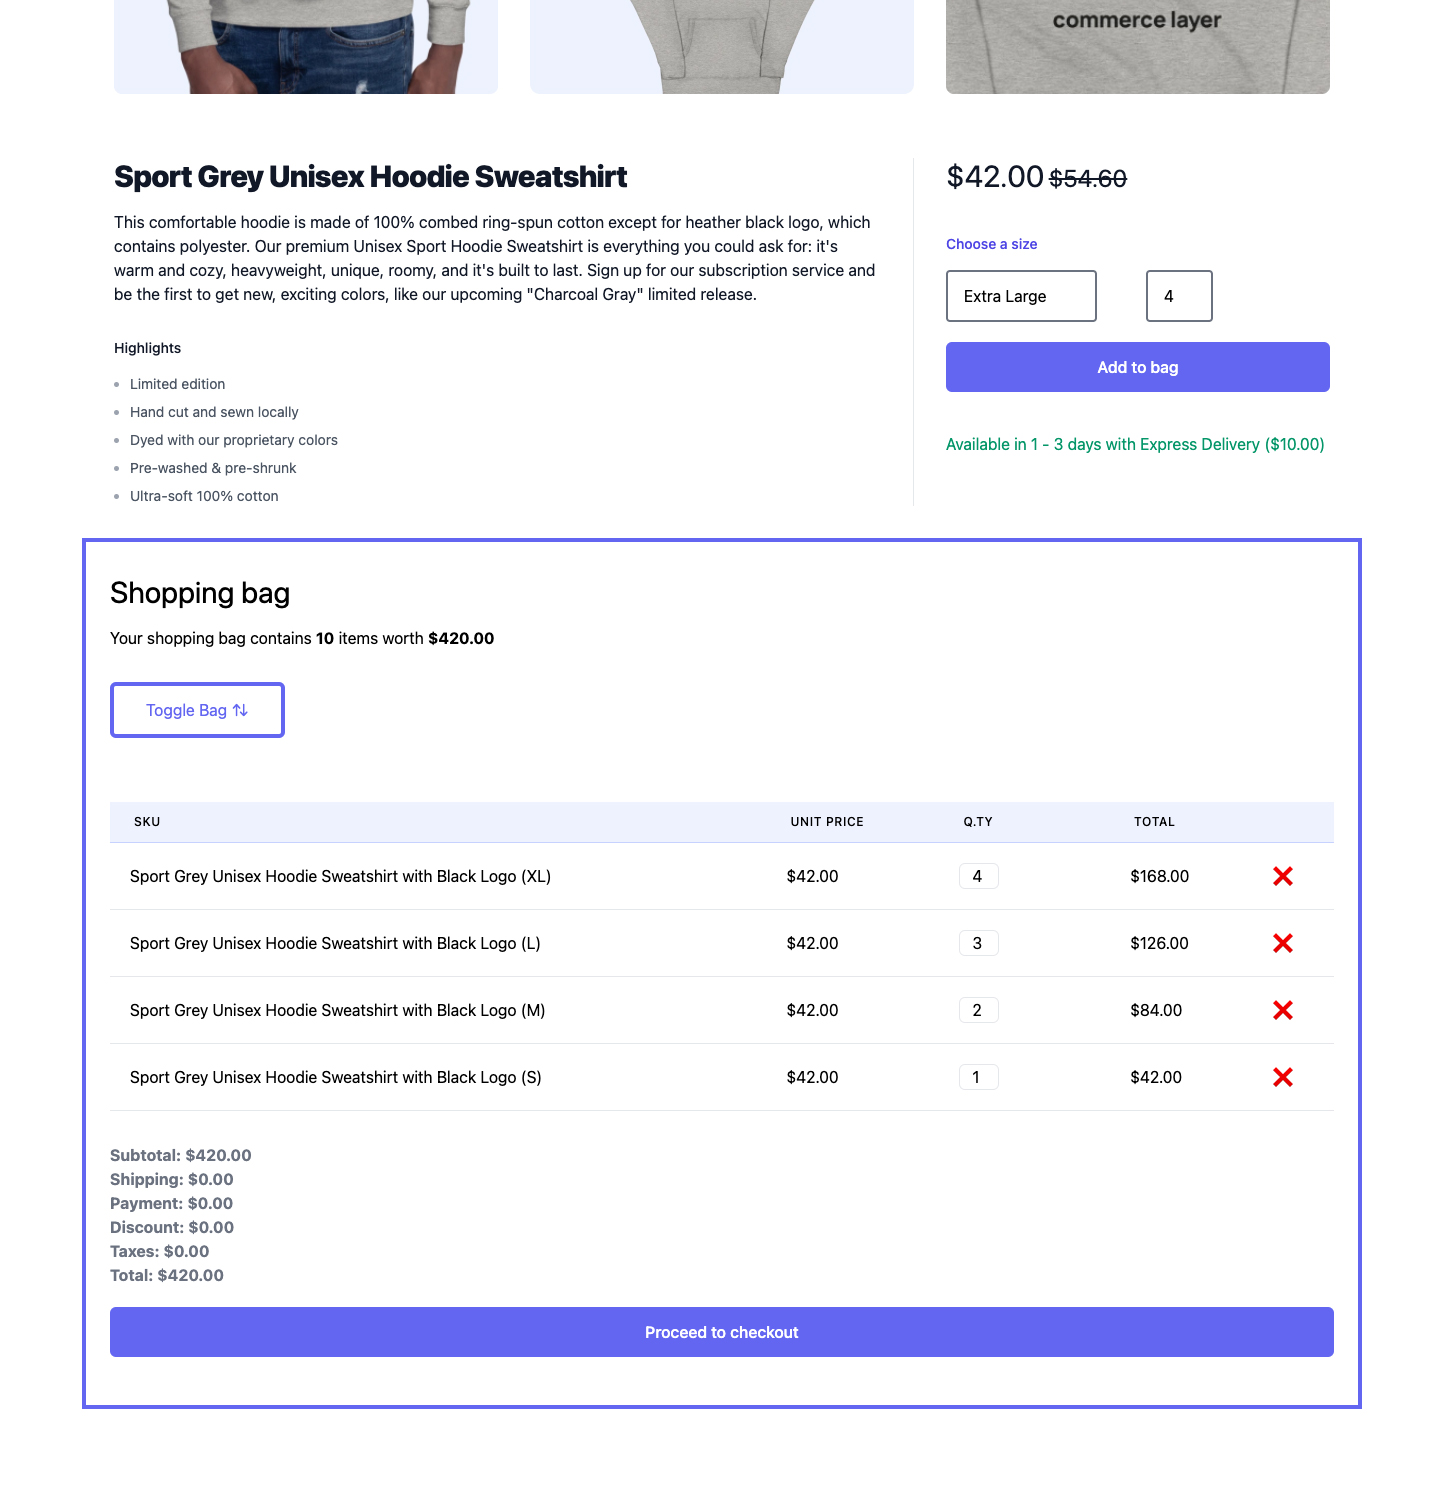
The shopping bag includes a list of all items added to the bag alongside a summary of the current shopping bag details. Add an element with clayer-shopping-bag-container ID wherever you want to show the shopping bag. The clayer-shopping-bag-items-container is used as the parent element of the shopping bag line items, built from the clayer-shopping-bag-item-template template tag. The lists below explain what each child data attribute does.
The line item template elements:
clayer-shopping-bag-item-name — will be populated with the name of the SKU.clayer-shopping-bag-item-unit-amount — displays the unit amount of the SKU.clayer-shopping-bag-item-qty-container — displays an input field with the quantity of the SKU added to the bag (you can use this to update the quantity too).clayer-shopping-bag-item-availability-message-container — displays an “out of stock” message (contained in clayer-availability-message-unavailable-template) when you change a quantity and that quantity is not available.clayer-shopping-bag-item-total-amount — displays the total amount of a line item.clayer-shopping-bag-item-remove — displays a link to remove an item from the shopping bag.The order summary elements:
clayer-shopping-bag-subtotal — displays the subtotal amount of the entire shopping bag.clayer-shopping-bag-shipping — displays the shipping cost of the order.clayer-shopping-bag-payment — displays the selected payment method charge (if any).clayer-shopping-bag-discount — displays the discount amount of the order (if applied).clayer-shopping-bag-taxes — displays the cost of tax (if present).clayer-shopping-bag-total — displays the grand total summing up all the above costs for the order.By default, the shopping bag container is always closed. The clayer-shopping-bag-toggle element toggles an open class (attached to a button) on the shopping bag container.
<!DOCTYPE html>
<html>
<head>
<!-- Static content [...] -->
</head>
<body>
<!-- Static content [...] -->
<!-- Price [...] -->
<!-- Variants (select sizes) -->
<!-- Add to bag quantity -->
<!-- Availability message templates -->
<!-- Shopping bag -->
<div class="...">
<h2 class="...">Shopping bag</h2>
<p class="...">
Your shopping bag contains
<span class="... clayer-shopping-bag-items-count">0</span>
items worth
<span class="... clayer-shopping-bag-total"></span>
</p>
<button class="... clayer-shopping-bag-toggle">
Toggle Bag ⇅
</button>
<div id="clayer-shopping-bag-container">
<table class="...">
<thead class="...">
<tr>
<th class="...">
SKU
</th>
<th class="...">
Unit price
</th>
<th class="...">
Q.ty
</th>
<th class="...">
Total
</th>
<th class="...">
</th>
</tr>
</thead>
<tbody class="..." id="clayer-shopping-bag-items-container"></tbody>
<template id="clayer-shopping-bag-item-template">
<tr>
<td class="...">
<span class="clayer-shopping-bag-item-name"></span>
</td>
<td class="... clayer-shopping-bag-item-unit-amount"></td>
<td class="... clayer-shopping-bag-item-qty-container">
<input
type="number"
min="1"
class="..."
/>
<span
class="... clayer-shopping-bag-item-availability-message-container"></span>
</td>
<td class="... clayer-shopping-bag-item-total-amount"></td>
<td>
<a href="#" class="... clayer-shopping-bag-item-remove">❌</a>
</td>
</tr>
</template>
</table>
<hr />
<div class="...">
<div class="...">
<p class="...">
Subtotal:
<span class="clayer-shopping-bag-subtotal"></span>
</p>
<p class="...">
Shipping:
<span class="clayer-shopping-bag-shipping"></span>
</p>
<p class="...">
Payment:
<span class="clayer-shopping-bag-payment"></span>
</p>
<p class="...">
Discount:
<span class="clayer-shopping-bag-discount"></span>
</p>
<p class="...">
Taxes:
<span class="clayer-shopping-bag-taxes"></span>
</p>
<p class="...">
Total:
<span class="clayer-shopping-bag-total"></span>
</p>
</div>
</div>
<!-- Config [...] -->
<!-- JS Library [...] -->
</body>
</html>
Add an element with clayer-shopping-bag-checkout class wherever you want to show the checkout button. This button will link to a dedicated checkout page where a customer can complete their purchase and place the order. We'll explain how this works soon.
<!DOCTYPE html>
<html>
   <head>
      <!-- Static content [...] -->
   </head>
   <body>
      <!-- Static content [...] -->

      <!-- Price  [...] -->

      <!-- Variants (select sizes) -->

      <!-- Add to bag quantity -->

      <!-- Availability message templates -->

      <!-- Shopping bag -->

      <!--Checkout button-->
      <a href="#" class="... clayer-shopping-bag-checkout">
      Proceed to checkout
      </a>

      <!-- Config [...] -->

      <!-- JS Library [...] -->
   </body>
</html>
Coupled together, we get a nice-looking product page with some static content and some elements updated dynamically. In summary, once a user selects a variant and clicks the "Add to bag" button, we pass the data down with help from the specified data attributes and create an order associated with some line items. If there are any errors, we display them in the availability message container. The customer can then decide to check out the order.
The Drop-in library uses the Commerce Layer checkout application to provide a PCI-compliant, PSD2-compliant, and production-ready checkout flow powered by Commerce Layer APIs. The orders API will return the checkout URL using the format <your organization slug>.checkout.commercelayer.app/:order_id?accessToken=<token>. The Drop-in library will then automatically pass that URL to the checkout button (with class clayer-shopping-bag-checkout) alongside the order ID and required access token. When you click on the checkout button, you will be redirected to the checkout application. Upon successful checkout, the order will be sent to and can be managed in the orders management system (OMS), in the Commerce Layer dashboard. So cool, right 🙃?
Now let's push our project to GitHub and deploy it to Netlify or Vercel. Whenever you push any change to GitHub, both tools will run your build and re-deploy the repository again. You can follow the guidelines in the documentation for Netlify or Vercel to get set up for either tool.
An order can consist of a customer, line items (SKUs, cost of shipping method, cost of payment method, taxes, or gift cards), a billing address, a shipping address, discount(s) calculated from active promotions, redeemed gift card(s), a payment method, and a payment source type. You can read this guide to learn more about the anatomy of an order and check out the Commerce Layer API reference. Also, check out the Commerce Layer data model for an overview of the most relevant API entities, their mutual relationships, and common usage (including E-R diagrams).
Here are some more resources to learn about headless commerce, Commerce Layer, and data attributes:
Yes! You have successfully turned a website into a shoppable website using Commerce Layer and the Drop-in Library; how cool is that?! 😃.
With Commerce Layer, you can manage all transactional parts of your ecommerce business, integrate with any CMS of your choice to manage content, build your user interface/experience with your favorite technologies, and build your business logic without friction. In addition, this will result in more flexibility and autonomy between sub-teams in your engineering team, thereby helping you scale your business globally.
This is a great way to quickly start building with Commerce Layer and can be used for specific use cases such as adding ecommerce to a Jamstack website or transforming a Shopify theme into a multi-market store. To create a comprehensive global shopping platform for your brand, check out our documentation and join our Slack community to learn about the possibilities.