

How to Build an Audio Chatbot with Nextjs, OpenAI, and ElevenLabs
B
undefined or mostly null.
Search for a command to run...
undefined or mostly null.
Clear, practical, and beginner-friendly overview with a nice balance of context and hands-on guidance. The implementation flow is straightforward, and the personal touch makes it engaging.
Excellent article. Very interesting to read. I really love to read such a nice article. geometry dash free
Amazing man, I really wanted to ask you how you handled the latency of this? How long a user had to wait to get the response?
Thanks for your comment, Ashish!
As I mentioned in the "Notes and Recommendations" section, I used the ElevenLabs eleven_turbo_v2 model since it’s more suitable for tasks demanding low latency, intentionally set the max_tokens OpenAI parameter to 100, and used a custom prompt to reduce the number of characters returned to 100. This worked perfectly for my use case.
Very useful information for me. I am also a web developer you can check piyushmaurya.in.
Ahh, thank you!
Kambo a traditional Amazonian medicine, has gained attention worldwide for its purported healing properties. Derived from the secretion of the giant monkey frog (Phyllomedusa bicolor), Kambo has been used for centuries by indigenous tribes for various purposes, including purification rituals and hunting enhancement. Administered through small burns on the skin, Kambo is believed to cleanse the body of toxins, boost immunity, and promote mental clarity. Despite limited scientific research, anecdotal evidence suggests its potential benefits for conditions ranging from chronic pain to addiction. However, its powerful effects and the risks associated with its administration underscore the importance of seeking guidance from trained practitioners familiar with its usage and potential side effects.
In this series, I will share articles related to best practices for building and deploying applications on the web with the JavaScript and Python programming languages.
Some years ago, GitHub introduced the new Profile README feature that allowed GitHub users to pin a markdown file on their profile using a special repository named after their GitHub username. Since then, developers have used this file as a quick por...
I wrote this article in December 2023 for an interview screening task and thought to share it today while clearing my drafts for some new content prep, just in case it's still helpful to someone out t

Hey! I’m super excited to announce that I have joined the Secretariat Team at the Digital Public Goods Alliance. In this role, I leverage my passion for open source and technical background to assess DPG applications, provide technical support and ad...

Creative designs have become more important than ever in the software ecosystem today with many industries and end-consumers having several use cases that require them to offer design editing solutions to either designers or end-consumers. Every busi...
Some years ago, GitHub introduced the new Profile README feature that allowed GitHub users to pin a markdown file on their profile using a special repository named after their GitHub username. Since then, developers have used this file as a quick por...

With the rise of artificial intelligence (AI) and large language models (LLMs), it has become easier to solve different human problems than ever before. Even consumers with little to no technical expertise can benefit from AI. Humans can now automate complex tasks, gain insights from data, enjoy the benefits of assistive services, and many more. The possibilities of LLMs are endless, and we're just beginning to scratch the surface of what's possible with the numerous product features rising in the AI industry. Over the past weeks, I experimented with AI, LLMs, and the latest Nextjs App Router to see how AI tools and audio can be integrated on the web. This was really fun, and I learned some new things I’d like to share with you today.
After building some demos, I came up with a simple chatbot implementation. In this tutorial, we will build a conversational text and voice chatbot with full-stack Nextjs, OpenAI, and ElevenLabs. A user would be able to ask a question by text and get an audio and text response. Sounds interesting to you? Then Let’s get into it! If you want to see the code, you can head to this repository now, but you might want to read along to learn one or two things, especially if you’re new to this :).

To get the best out of this tutorial, you need to have/do the following:
Nodejs and NPM installed on your computer.
An IDE and terminal installed on your computer (I use Visual Studio Code!).
A web browser installed on your computer (I use Arc!).
Some prior knowledge of the JavaScript and TypeScript programming language.
Some prior knowledge of the Reactjs JavaScript library.
Some prior knowledge of the Nextjs JavaScript framework.
A smile on your face :).
Since our goal is to allow a user to ask a question by text and get an audio response, we would need to:
Build a user interface with an input element for receiving the text input.
Send the text input to OpenAI using their API and receive a text response.
Send the received text response to ElevenLabs using their API and receive an audio response.
Return the final results (text response from OpenAI and audio response from ElevenLabs) to the user in the same user interface.
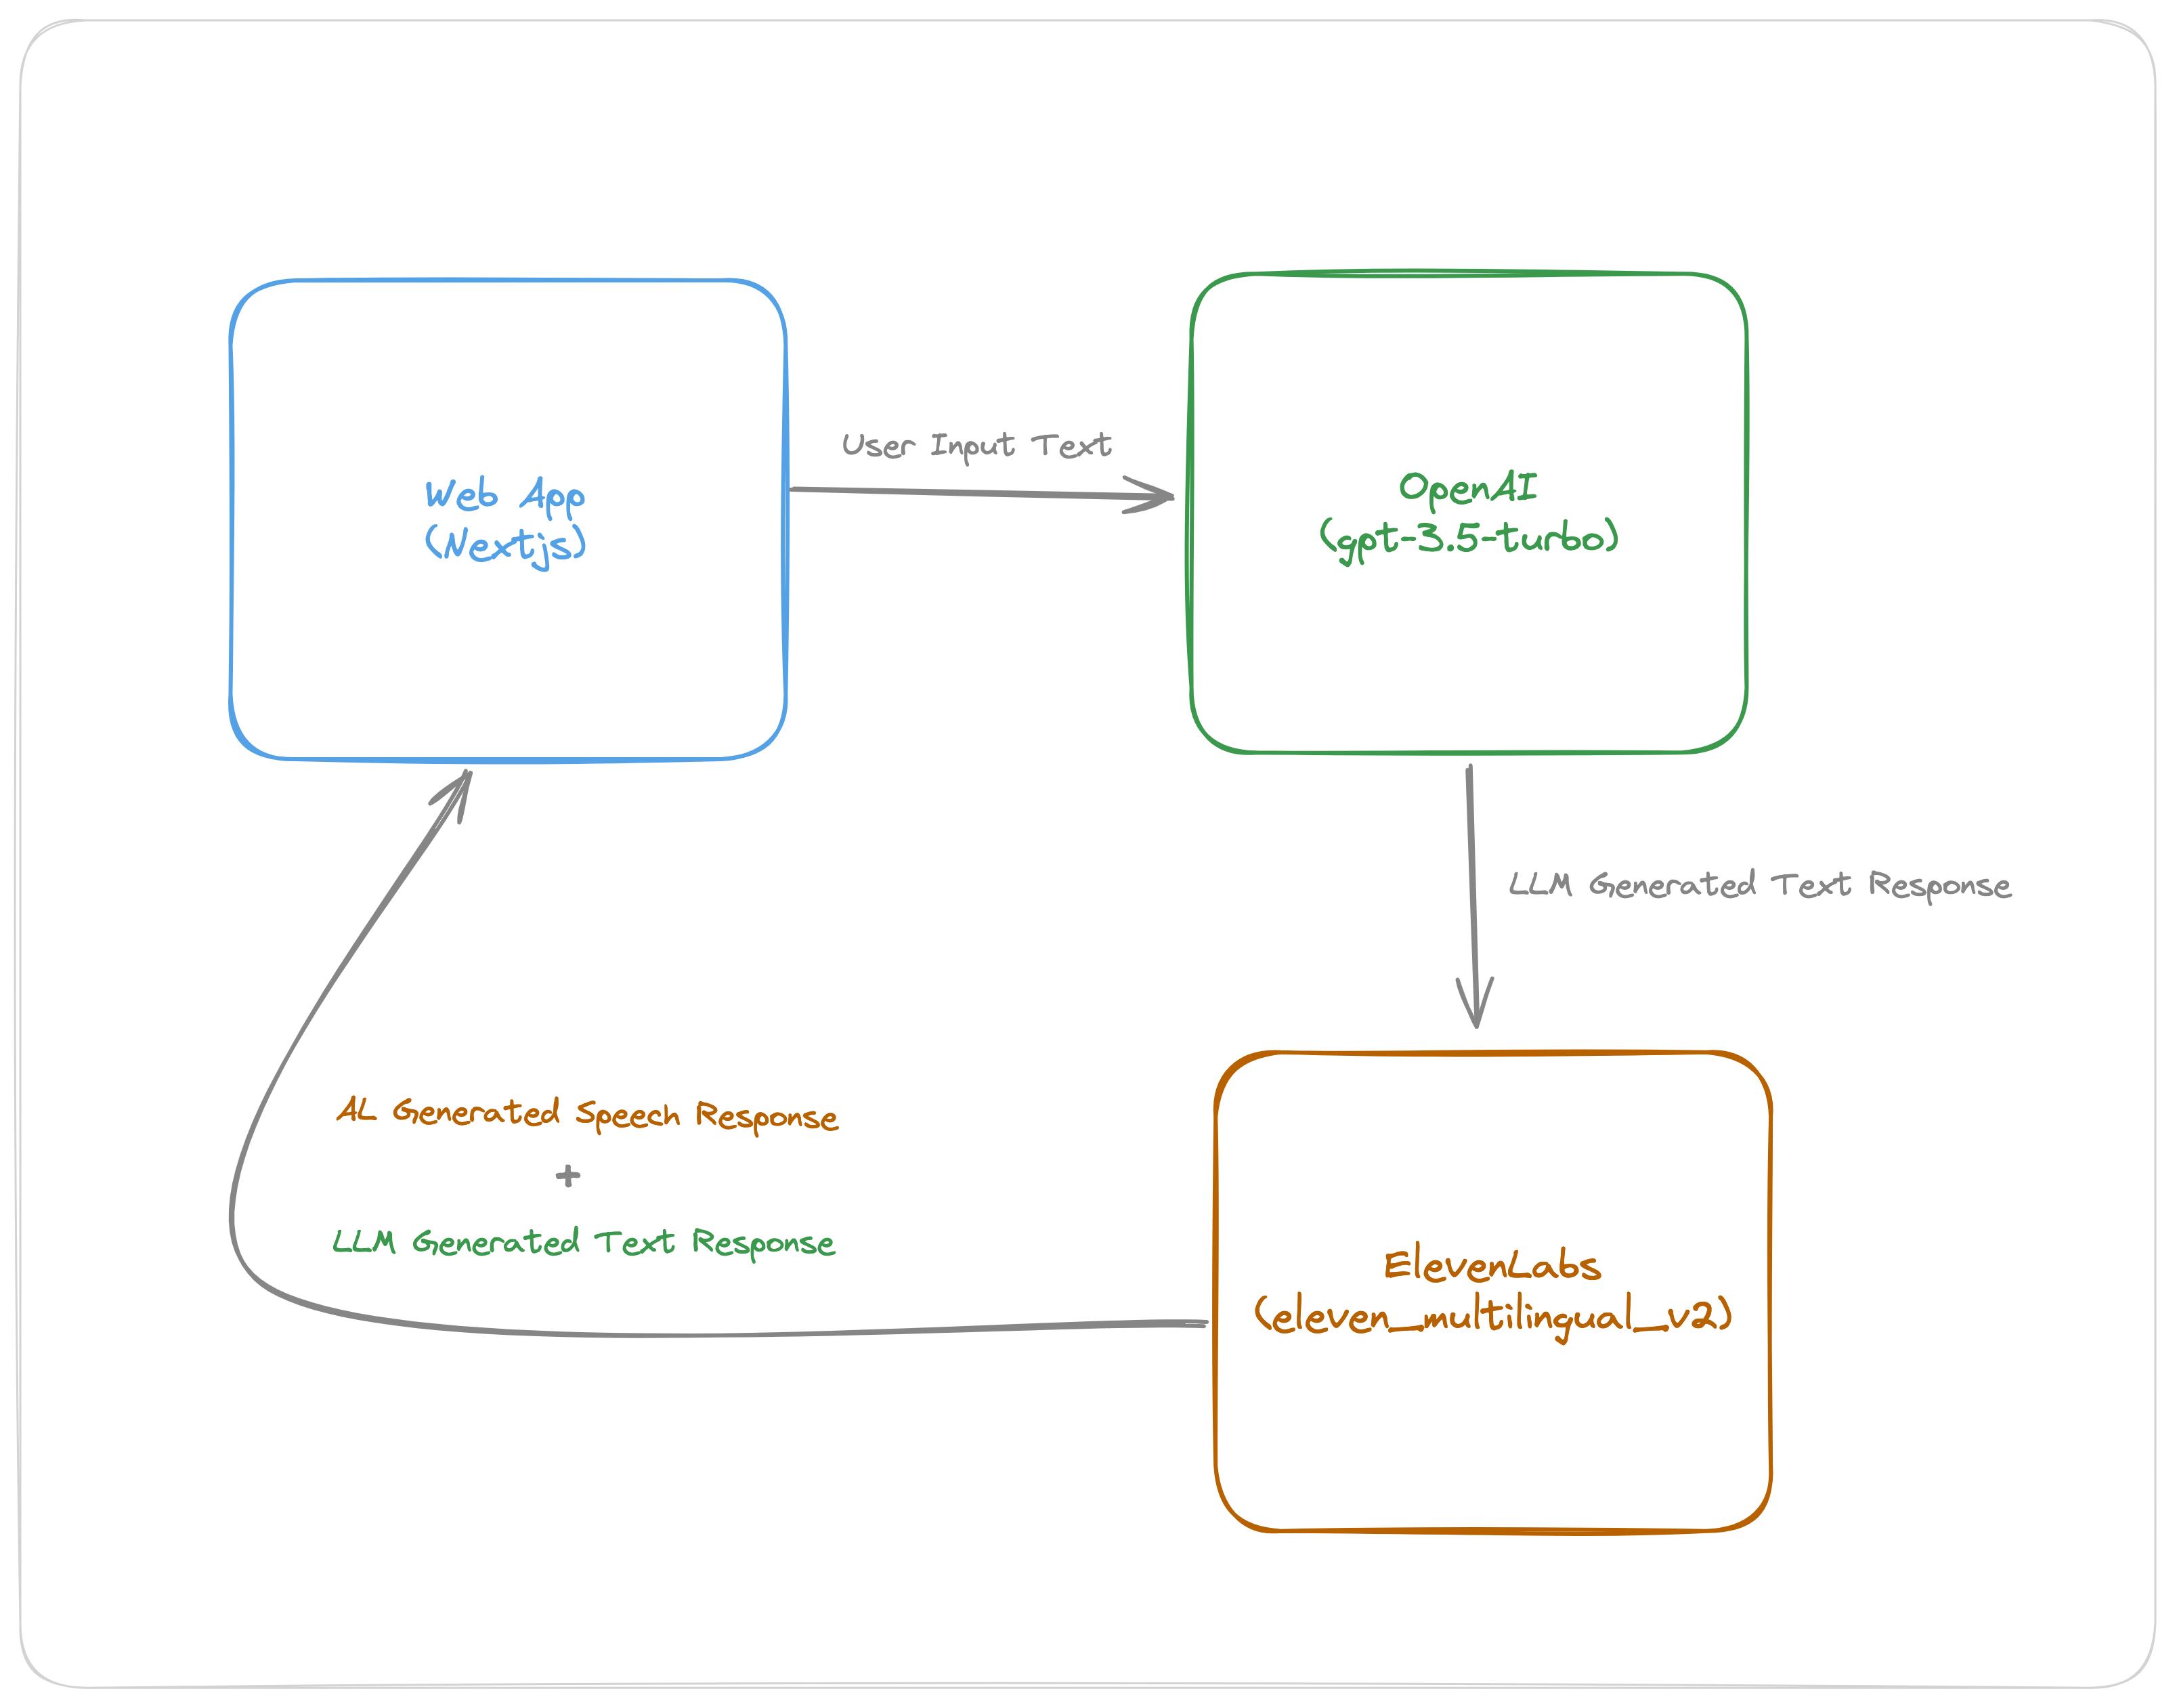
Now that we have a draft implementation flow designed, let’s briefly talk about some key concepts and the core tools we will be using for this application (specifically, OpenAI’s GPT and ElevenLabs’ Speech Synthesis Models) in the sections below.
The terms below should help you get acquainted with some of the concepts introduced in this tutorial, especially if you’re new to AI and LLMs.
OpenAI is an AI research company building artificial general intelligence (AGI). They’ve built several models (you can explore the full list here), but for this tutorial, we will use the GPT text generation model through the Chat Completions API. OpenAI uses its large language model to build ChatGPT and also provides the LLM as an API for developers to build their own applications. This allows developers to build creative stuff powered by AI for different use cases. I’m sure in the past year, you have seen almost every startup include some AI feature in their product, like GitHub Copilot, Notion AI, Grammarly AI, Vercel’s v0, tldraw make a real, etc. These startups either build their own in-house model or use OpenAI’s GPT or DALL-E or Whisper models (or other similar models like Meta's LLaMA, Google’s Gemini, Anthropic’s Claude, Midjourney, Mistral AI, Stability AI, etc.). I’m sure many like myself started hearing more about LLMs from the launch of ChatGPT for consumers, but many companies have been building AI tools for years now, like Microsoft’s Sketch2Code, amongst many others.
ElevenLabs has created realistic AI audio models, providing the ability to generate speech in hundreds of voices in 25+ languages. You can design brand new synthetic voices from scratch, clone your own voice, or use one from their voice library for speech synthesis (text-to-speech or speech-to-speech), creating audiobooks, or even video translations. Using their API to generate audio from text is quite straightforward, as seen in the code snippet below. You can also look at this sandbox repository I created with quick examples of making requests with ElevenLabs’ API and client libraries (JavaScript and Python).
async function generateAudio() {
  const voiceId = "IKne3meq5aSn9XLyUdCD";

  const response = await fetch(
    `https://api.elevenlabs.io/v1/text-to-speech/${voiceId}`,
    {
      method: "POST",
      headers: {
        Accept: "audio/mpeg",
        "Content-Type": "application/json",
        "xi-api-key": process.env.ELEVENLABS_API_KEY,
      },
      body: JSON.stringify({
        model_id: "eleven_multilingual_v2",
        text: "Hi, I'm Bolaji Ayodeji. How are you doing today?",
        voice_settings: { similarity_boost: 0.5, stability: 0.5 },
      }),
    }
  );

  await fs.writeFile("audio-js.mp3", await response.buffer(), "binary");
  console.log("Audio file saved successfully!");
}
Here’s a sample output of the request above using a random voice selection:
I also used their dubbing feature to translate the audio in this summary video below of myself and other speakers at InfoBip’s Shift conference to French. Now, I can argue with you that I was born in Paris 😅.
Just kidding. Anyway, let’s get back to the tutorial :).
To get started, use create-next-app to set up a new Nextjs project with TypeScript and App Router like so:
npx create-next-app@latest
Next, create some extra directories and files, as seen in the file structure below (the directories with an asterisk * beside the name are the extras):
┌── app
    ├── api*
       ├── chat
         ├── route.ts
       ├── speech
         ├── route.ts
    ├── chat*
      ├── page.tsx
    ├── components*
      ├── chatControls.tsx
      ├── chatInput.tsx
      ├── chatMessages.tsx
      ├── chatVoice.tsx
    ├── hooks*
      ├── useLocalStorage.ts
    ├── types*
      ├── chat.ts
    ├── utils*
      ├── getVoices.ts
      ├── notifyUser.ts
    ├── layout.tsx
    ├── page.tsx
┌── public
├── .env.local
...
├── package.json
└── tsconfig.json
Next, install ElevenLabs’ TypeScript SDK and the React Toastify library using the command below:
npm install elevenlabs react-toastify
Now, let’s generate API keys on both platforms we will be using.
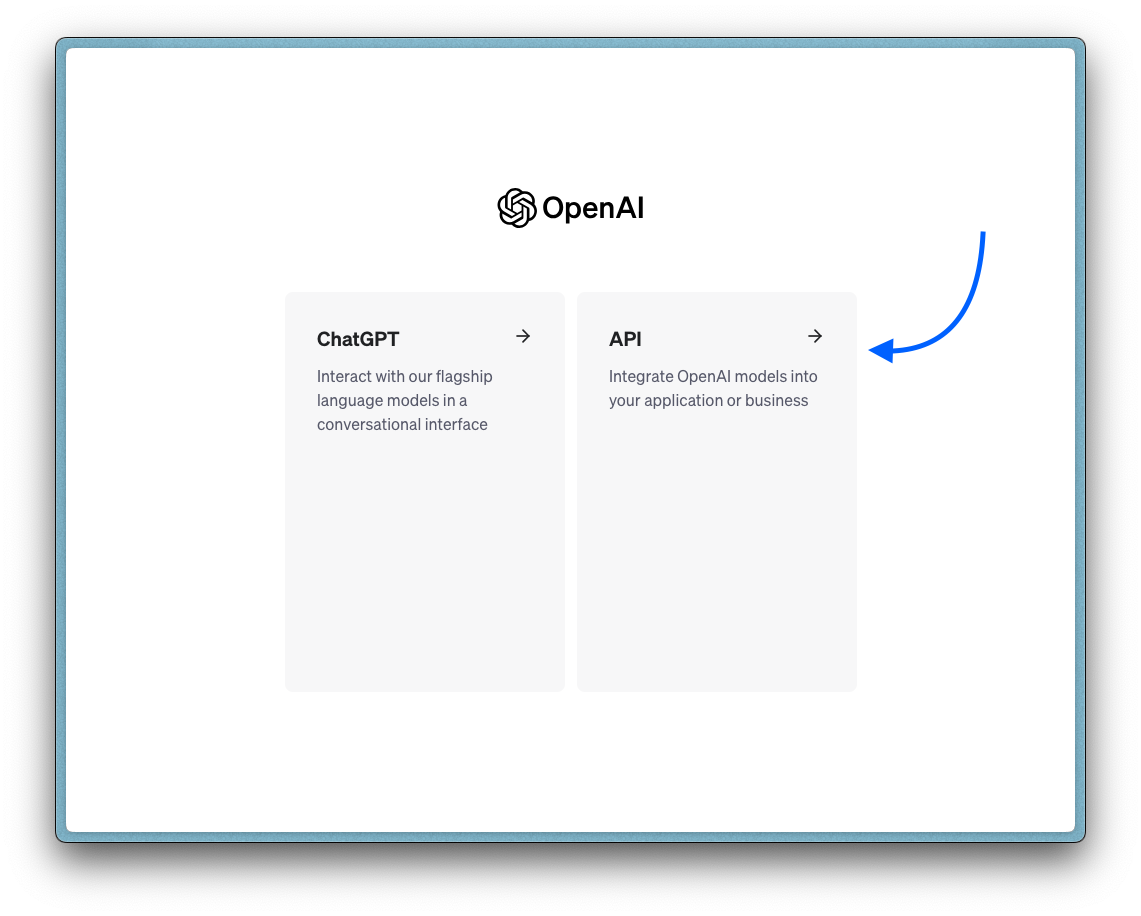
Kindly follow the steps below to create an OpenAI developer account and generate an API key:
1. Visit this website and create a new account.
2. Upon successful signup, you will be redirected to a new page. Select the “API” card displayed.
3. On the left side of the page, click “API Keys”, and this will take you to the desired page.
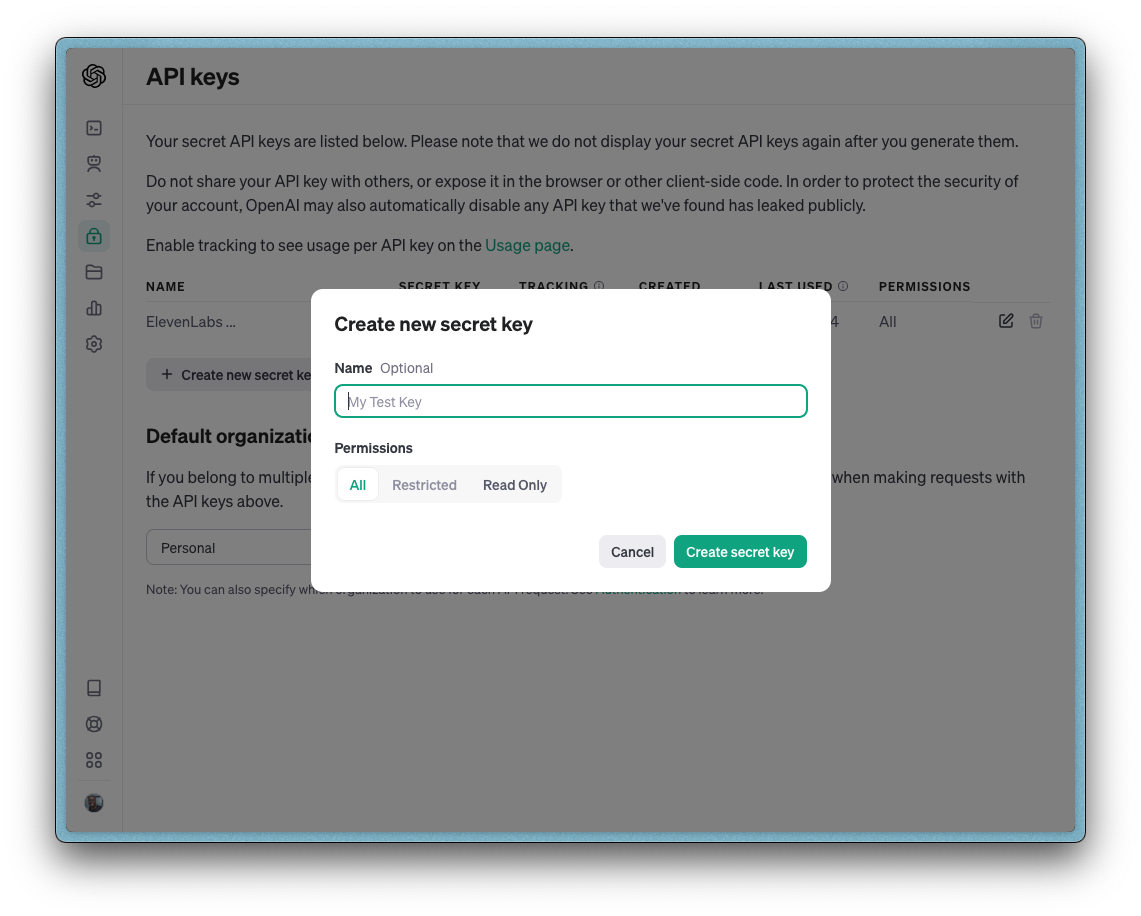
4. Now click the “Create new secret key” button and create a new API key. Once you do that, copy the key and add it to the .env.local file you created earlier (i.e., OPENAI_API_KEY=<the key here>).
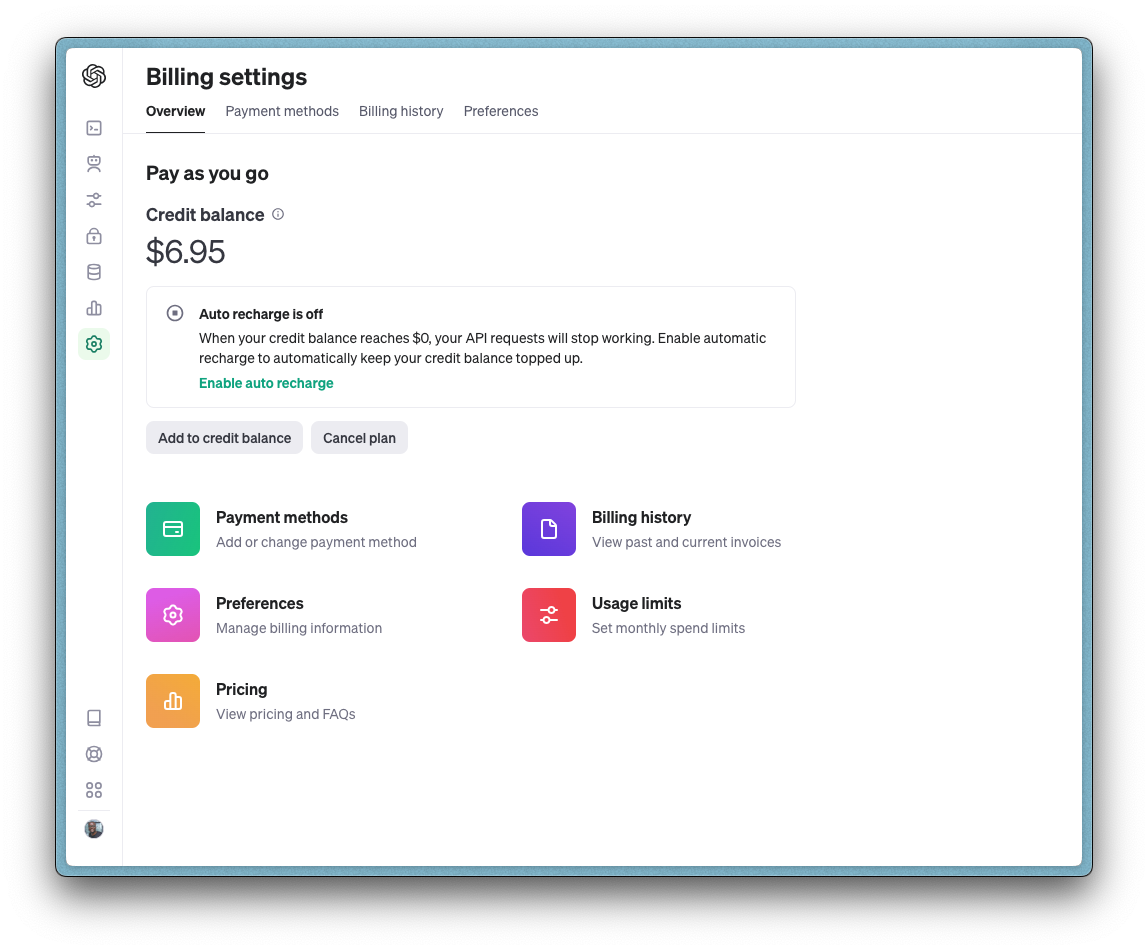
5. When you create a new account, you might get some free credits for your first few requests. If you exhaust that, you will need to buy some credits. All you have to do is click on "Settings" on the left side of the page and select "Billing" and this will take you to the desired page. Now click the "Add to credit balance" button to top up any amount you want (at least $5).
Kindly follow the steps below to create an ElevenLabs account and generate an API key:
1. Visit this website and create a new account.
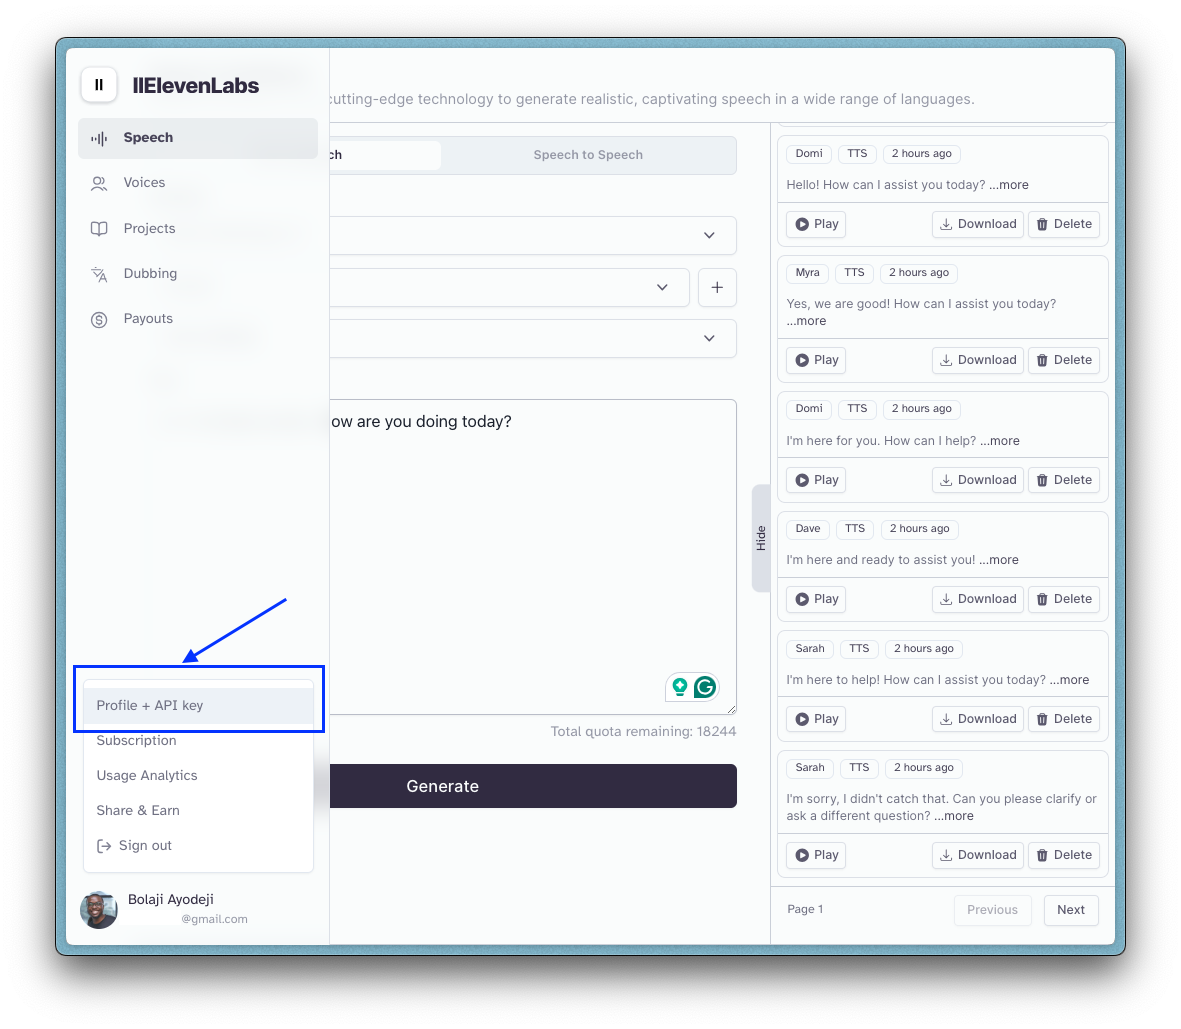
2. Upon successful signup, you will be redirected to a new page. At the bottom left section of the page, select the icon displayed, click on your name, and click on the “Profile + API” option.
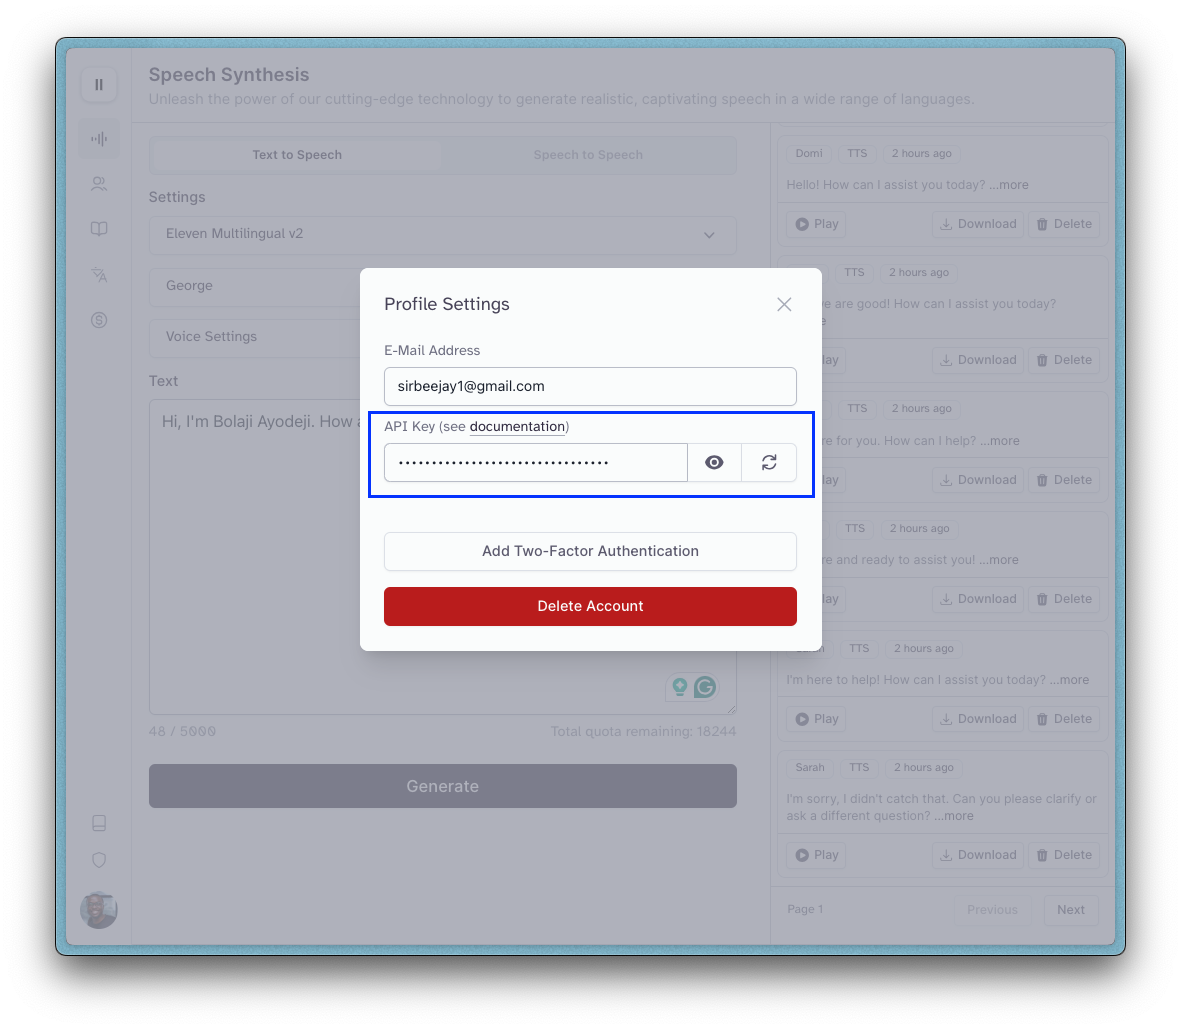
3. You should see a pop-up with an API key displayed. Copy the key and add it to the .env.local file you created earlier (i.e., ELEVENLABS_API_KEY=<the key here>). You can also regenerate a new API key here anytime you want by clicking the 🔄 button.
4. When you create a new account, you might get free 10,000 characters per month which should be sufficient. If you exhaust that and you want more, you can upgrade your plan in the "Settings > Subscription" page.
Now that we have our API keys ready, we can proceed to implement the project. With Nextjs, you can create APIs (API Routes) and there are so many ways to fetch data on the client or server-side aside. But since we’re using the latest version of Nextjs, we can experiment with the new Route Handlers and Server Actions.
Route Handlers are a replacement for the previous API Routes and can be defined in directories anywhere in the app directory, inside a route.js or route.ts file. A good convention is to define them in a /app/api subdirectory.
Server Actions are asynchronous functions that are executed on the server and can be used in both Server and Client components to handle form submissions and data mutations. In a Server Component, you must use the "use server" directive at an inline function or module level and in a Client Component, you must import another file that uses the "use server" directive at the module level. You can watch this video to learn more about this concept and it's benefits.
Now that we're up to speed, let's proceed with building our API. We will create a public API to fetch data from OpenAI and ElevenLabs and then use the APIs somewhere in the UI upon user request to generate responses.
First, let's define all the type interfaces we will import across the project in the /app/types/chat.ts file, as seen in the code below:
import { Voice as VoiceResponse } from "elevenlabs/api";

export const userRole = "user";
export const botRole = "assistant";

export interface Message {
  role: typeof userRole | typeof botRole;
  content: string;
}

export interface ChatVoiceProps {
  voices: VoiceResponse[];
  selectedVoice: string;
  setSelectedVoice: (voice: string) => void;
}

export interface ChatMessagesProps {
  messages: Message[];
}

export interface ChatInputProps {
  input: string;
  setInput: (input: string) => void;
  loading: boolean;
  sendMessage: (e: React.FormEvent<HTMLFormElement>) => void;
}

export interface ChatControlsProps {
  audioRef: React.RefObject<HTMLAudioElement>;
  savedAudio: boolean;
  messages: Message[];
  clearMessages: () => void;
}
Now, let's create a new API. In the /app/chat/route.ts file, add the code below:
import { Message } from "@/app/types/chat";

export const runtime = "edge";

export async function POST(req: Request) {
  const { messages } = await req.json();

  messages.map((message: Message) => {
    if (message.role === "user") {
      message.content = `Imagine you are Siri, Apple's digital assistant and a user asks you the question: "${message.content}". Kindly generate a suitable response.`;
    }

  const res = await fetch("https://api.openai.com/v1/chat/completions", {
    method: "POST",
    headers: {
      "Content-Type": "application/json",
      Authorization: `Bearer ${process.env.OPENAI_API_KEY}`
    },
    body: JSON.stringify({
      model: "gpt-3.5-turbo",
      max_tokens: 100,
      temperature: 0.7,
      n: 1,
      messages
    })
  });
  const data = await res.json();

  if (data.error && data.error.code === "invalid_api_key") {
    return Response.json("Something went wrong. Kindly check for error alerts.", {
      status: 401
    });
  }

  const output = data.choices[0]?.message?.content?.trim();

  return Response.json(output);
}
Here, we make a POST request to OpenAI’s Chat Completion API, passing in the messages value from the UI. The request’s body expects the following parameters:
model: the ID of the model to use. You can explore the list of all the available models, including how they affect your API credits. For this tutorial, we will use the gpt-3.5-turbo model since it's more cost-effective.
max_tokens: The maximum number of tokens that can be generated in the chat completion. Generally, one token is equivalent to ~4 characters of English text.
temperature: Values between 0 and 2 that determine how GPT should generate a response. Higher values will lead to more random or creative responses, while lower values will lead to more focused and deterministic outputs.
n: The number of chat completion choices GPT will generate for each input message. If you want to offer your users multiple options, then you should change this parameter, but for our use case, one is fine.
messages: A list of messages of the entire conversation. This will be an array of objects, with each object containing messages from either the user, GPT, or both. Each object must contain:
role: who’s sending the message (either user, system, assistant or tool)
content: the content of the message (e.g., How can I fry plantain?)
[
   {
     "role": "user",
     "content": "Hello world!"
   },
   {
     "role": "system",
     "content": "Hello! How can I assist you today?"
   },
   {
     "role": "user",
     "content": "How can I fry plantain?"
   },
   {
     "role": "system",
     "content": "Frying plantains is a straightforward process..."
   }
   ...
];
To learn more about each of these parameters and the other available options, read OpenAI’s API Reference documentation or read the LLM Settings section of this Prompt Engineering Guide (highly recommend!). When a request is made to this API route, it returns an object like the code snippet below, and we will then render the data to the UI.
{
  id: 'chatcmpl-5sDSChIREMEImOpENToworK',
  object: 'chat.completion',
  created: 1377924170,
  model: 'gpt-3.5-turbo-0613',
  choices: [
      {
          index: 0,
          message: { role: 'assistant', content: 'Hello! How can I assist you today?' },
          logprobs: null,
          finish_reason: 'stop'
        }
    ],
  usage: { prompt_tokens: 219, completion_tokens: 9, total_tokens: 228 },
  system_fingerprint: null
}
Next, let's create a new API. In the /app/speech/route.ts file, add the code below:
import { ElevenLabsClient } from "elevenlabs";

export async function POST(req: Request) {
  const { message, voice } = await req.json();

  const elevenlabs = new ElevenLabsClient({
    apiKey: process.env.ELEVENLABS_API_KEY
  });

  try {
    const audio = await elevenlabs.generate({
      voice,
      model_id: "eleven_turbo_v2",
      voice_settings: { similarity_boost: 0.5, stability: 0.5 },
      text: message
    });

    return new Response(audio as any, {
      headers: { "Content-Type": "audio/mpeg" }
    });
  } catch (error: any) {
    console.error(error);
    return Response.json(error, { status: error.statusCode });
  }
}
Here, we make a POST request to ElevenLabs’ Text-to-Speech API, passing in the voice and text values from the UI. The request’s body expects the following parameters:
voice: the name of the voice to be used in generating the audio. ElevenLabs offers pre-made and community-created voices in 29 languages, but only about 35+ are added by default to your account. To add more, explore the voice library or make a new voice.
model_id: the ID of the model to use. These are the available options as extracted from the /models API:
| Model ID | Description |
eleven_multilingual_v2 | Our state of the art multilingual speech synthesis model, able to generate life-like speech in 29 languages. |
eleven_monolingual_v1 | Use our standard English language model to generate speech in a variety of voices, styles and moods. |
eleven_english_sts_v2 | Our state-of-the-art speech to speech model suitable for scenarios where you need maximum control over the content and prosody of your generations. |
eleven_multilingual_sts_v2 | Our cutting-edge, multilingual speech-to-speech model is designed for situations that demand unparalleled control over both the content and the prosody of the generated speech across various languages. |
eleven_turbo_v2 | Our cutting-edge turbo model is ideally suited for tasks demanding extremely low latency. |
voice_settings: the settings to override the default stored voice settings of the voice in use. You can learn more about the options for this in this documentation.
text: the text message you want to convert to speech.
To learn more about each of these parameters and the other available options, read ElevenLabs’ API Reference documentation. When a request is made to this API route, it returns a Blob object ReadableStream raw data. Since we’re working on the web, we can’t use the play() function that comes with the SDK to play the audio directly. We will then have to process this Blob object to work inside a <audio> element.
First, add the code below in the /app/utils/getVoices.ts file to fetch voices from ElevenLabs (all voices in your account). If you created a cloned voice or generated a new one, they all will be returned from the API.
"use server";

import { ElevenLabsClient } from "elevenlabs";

export default async function getVoices() {
  const elevenlabs = new ElevenLabsClient({
    apiKey: process.env.ELEVENLABS_API_KEY,
  });

  try {
    const allVoices = await elevenlabs.voices.getAll();
    return allVoices.voices;
  } catch (error) {
    console.error(error);
  }
}
Next, add the code below in the /app/utils/notifyUser.ts file. We will use this to display alerts using the React Toastify library.
import { toast } from "react-toastify";
import type { ToastContent, ToastOptions } from "react-toastify";

export default function notifyUser(
  message: ToastContent,
  options: ToastOptions
) {
  toast(message, {
    position: "top-right",
    theme: "light",
    hideProgressBar: true,
    closeOnClick: true,
    pauseOnHover: true,
    draggable: true,
    pauseOnFocusLoss: false,
    ...options,
  });
}
You will also need to addd<ToastContainer> and the ReactToastify.min.css CSS file in app/layout.tsx to make the library work like so:
import { ToastContainer } from "react-toastify";
import "react-toastify/dist/ReactToastify.min.css";

export default function RootLayout({
  children
}: Readonly<{
  children: React.ReactNode;
}>) {
  return (
    <html lang="en">
      <body>
        {children}
        <ToastContainer stacked />
      </body>
    </html>
  );
}
Add the code below in the /app/hooks/useLocalStorage.ts file to save and get data from localStorage and useState. We will reuse this multiple times later to store data like the messages and selected voice.
import { useEffect, useState } from "react";

export default function useLocalStorage<T>(key: string, initialValue: T): [T, (value: T) => void] {
  const [savedValue, setSavedValue] = useState(initialValue);

  useEffect(() => {
    const item = localStorage.getItem(key);
    if (item) setSavedValue(JSON.parse(item));
  }, [key]);

  const updateValue = (value: T) => {
    setSavedValue(value);
    localStorage.setItem(key, JSON.stringify(value));
  };
  return [savedValue, updateValue];
}
Now that we have created our API routes, we will create and import a couple of components inside the /app/chat/page.tsx file (this is the file that renders the UI on the /chat slug) as seen below. If you’re familiar with Reactjs, you should be able to understand what’s going on here. However, I have added comments to summarize each part of the logic. Kindly read through them slowly for some more context.
"use client";

// Import all we need.
import { useState, useEffect, useRef } from "react";
import ChatVoice from "@/app/components/chatVoice";
import ChatMessages from "@/app/components/chatMessages";
import ChatControls from "@/app/components/chatControls";
import ChatInput from "@/app/components/chatInput";
import useLocalStorage from "@/app/hooks/useLocalStorage";
import getVoices from "@/app/utils/getVoices";
import notifyUser from "@/app/utils/notifyUser";
import { userRole, botRole, Message } from "@/app/types/chat";
import { Voice as VoiceResponse } from "elevenlabs/api";

export default function ChatPage() {
  // Ref hook to update the audio element.
  const audioRef = useRef<HTMLAudioElement>(null);

  // Store the list of voices.
  const [voices, setVoices] = useState<VoiceResponse[]>([]);

  // Store the name of the selected voice.
  const [selectedVoice, setSelectedVoice] = useLocalStorage<string>("selectedVoice", "Myra");

  // Store the message the user enters in the input field.
  const [input, setInput] = useState("");

  // Store the list of all messages (user and bot).
  const [messages, setMessages] = useLocalStorage<Message[]>("chatMessages", []);

  // Store the state of generating a response.
  const [loading, setLoading] = useState<boolean>(false);

  // Store the state of generating the audio response.
  const [savedAudio, setSavedAudio] = useState<boolean>(false);

  // Function to make a request to the /chat API route (JSON response).
  const getOpenAIResponse = async (chatMessages: Message[]) => {
    const response = await fetch("/api/chat", {
      method: "POST",
      headers: {
        "Content-Type": "application/json"
      },
      body: JSON.stringify({ messages: chatMessages })
    });

    // Notify the user if the API Key is invalid.
    if (response.status === 401) {
      notifyUser("Your OpenAI API Key is invalid. Kindly check and try again.", {
        type: "error",
        autoClose: 5000
      });
    }

    const data = await response.json();
    return data;
  };

  // Function to make a request to the /speech API route (BLOB response).
  const getElevenLabsResponse = async (text: string) => {
    const response = await fetch("/api/speech", {
      method: "POST",
      headers: {
        "Content-Type": "application/json"
      },
      body: JSON.stringify({
        message: text,
        voice: selectedVoice
      })
    });

    // Notify the user if the API Key is invalid.
    if (response.status === 401) {
      notifyUser("Your ElevenLabs API Key is invalid. Kindly check and try again.", {
        type: "error",
        autoClose: 5000
      });
    }

    const data = await response.blob();
    return data;
  };

  // When the user clicks the submit button, this function runs.
  const sendMessage = async (event: React.FormEvent<HTMLFormElement>) => {
    event.preventDefault();

    // Set the loading state to true.
    setLoading(true);
    // Clear the input field.
    setInput("");

    // Store all messages from the user in an array of objects.
    const chatMessages: Message[] = [...messages, { role: userRole, content: input }];
    setMessages(chatMessages);

    // Make a request to OpenAI with the user's message.
    // For subsequent requests, this will include previous messages.
    const botChatResponse = await getOpenAIResponse(chatMessages);

    // Make a request to ElevenLabs with the current response from OpenAI.
    const botVoiceResponse = await getElevenLabsResponse(botChatResponse);

    // Read the contents of the Blob file using JavaScript's FileReader
    // https://developer.mozilla.org/en-US/docs/Web/API/FileReader.
    const reader = new FileReader();
    // Start reading the contents of the Blob file
    // Once finished, the `result` attribute will contain the
    // URL representing the file's data (base64 encoded string).
    reader.readAsDataURL(botVoiceResponse);
    reader.onload = () => {
      if (audioRef.current) {
        // Pass the file to the <audio> element's src attribute.
        // Will look like: data:audio/mpeg;base64,//uQxAAAC213G6GI0ZA8...
        audioRef.current.src = reader.result as string;
        // Immediately play the audio file.
        audioRef.current.play();
      }
    };

    // Add the bot's response to all the stored messages.
    setMessages([...chatMessages, { role: botRole, content: botChatResponse }]);
    // Set the loading state to false.
    setLoading(false);
    // Set the state of the audio to saved.
    setSavedAudio(true);
  };

  // Function to clear all messages from local storage.
  const clearMessages = async () => {
    setMessages([]);
    localStorage.removeItem("chatMessages");
  };

  useEffect(() => {
    // Fetch the voices from the getVoices() utility and store them.
    getVoices()
      .then((voices) => {
        setVoices(voices ?? []);
      })
      .catch((error) => {
        console.error("Error fetching voices:", error);
      });
  }, []);

  return (
    <main className="flex flex-col min-h-screen items-center justify-between py-4 px-4 lg:px-0">
      {voices.length === 0 ? (
        <p className="text-white text-9xl animate-ping">...</p>
      ) : (
        <>
          <ChatVoice {...{ voices, selectedVoice, setSelectedVoice }} />
          <ChatMessages {...{ messages }} />
          <div className="flex flex-col items-center w-full fixed bottom-0 pb-3 bg-gray-900">
            <ChatControls
              {...{
                audioRef,
                savedAudio,
                messages,
                clearMessages
              }}
            />
            <ChatInput
              {...{
                input,
                setInput,
                loading,
                sendMessage
              }}
            />
          </div>
        </>
      )}
    </main>
  );
}
In summary, we use the useState, useEffect, and useRef react hooks to set up some states, fetch data from our API, fetch the voices from the utility function, run some logic to process the data, and render the UI passing in the destructed prop values to the ChatVoice, ChatMessages, ChatControls, and ChatInput components.
Now let's add the code for all the components we used earlier in the /chat page.
1️⃣: In the /app/components/chatVoice.tsx file, add the code below:
import { ChatVoiceProps } from "@/app/types/chat";
export default function ChatVoice({ voices, selectedVoice, setSelectedVoice }: ChatVoiceProps) {
return (
<div className="flex flex-col w-full z-10 fixed top-0 text-center items-center bg-gray-900">
<div className="p-4 lg:p-8 lg:w-3/4 xl:w-2/4 border-0 lg:border-x-2 lg:border-white">
<label className="mb-2 block text-sm lg:text-base" htmlFor="voices">
Change Siri's Voice:
</label>
<select
id="voices"
name="voices"
className="p-2 w-4/4 text-sm lg:text-base appearance-none bg-transparent border border-white text-blue-500"
value={selectedVoice}
onChange={(event) => setSelectedVoice(event.target.value)}
>
{voices && voices
.sort((a, b) => (a.name!.localeCompare(b.name!))
.map((voice) => (
<option key={voice.voice_id} value={voice.name}>
{voice.name} ({voice.labels?.age} {voice.labels?.accent} {voice.labels?.gender})
</option>
))}
</select>
</div>
<hr className="w-full lg:w-3/4 xl:w-2/4" />
</div>
);
}
2️⃣: In the /app/components/chatMessages.tsx file, add the code below.
import Image from "next/image";
import type { ChatMessagesProps } from "@/app/types/chat";

export default function ChatMessages({ messages }: ChatMessagesProps) {
  return (
    <div className="absolute mt-20 lg:mt-40 pt-16 pb-48 px-6 w-full lg:w-3/4 xl:w-2/4 border-0 lg:border-x-2 lg:border-white">
      {messages && messages.length === 0 ? (
        <div className="flex flex-col items-center">
          <Image
            src="/logo.svg"
            className="mt-20"
            alt="Chat With Siri Logo"
            width={650}
            height={10}
            priority
          />
          <h2 className="text-xl text-center mt-12 animate-none lg:animate-bounce">
            Hi there! How can I help you today?
          </h2>
        </div>
      ) : (
        messages.map((message, index) => (
          <div key={index} className="my-6 lg:my-10">
            {message.role === "assistant" ? (
              <div className="flex mb-2 lg:mb-4">
                <Image src="/bot.svg" alt="Robot Icon" width={20} height={20} priority />
                <span className="ml-2 text-md lg:text-lg font-semibold text-blue-500">Siri:</span>
              </div>
            ) : (
              <div className="flex mb-2 lg:mb-4">
                <Image src="/face.svg" alt="Face Icon" width={18} height={18} priority />
                <span className="ml-2 text-md lg:text-lg font-semibold text-teal-500">You:</span>
              </div>
            )}
            <span className="text-md lg:text-lg">{message.content}</span>
          </div>
        ))
      )}
    </div>
  );
}
3️⃣: In the /app/components/chatControls.tsx file, add the code below.
import Image from "next/image";
import type { ChatControlsProps } from "@/app/types/chat";

export default function ChatControls({
  audioRef,
  savedAudio,
  messages,
  clearMessages
}: ChatControlsProps) {
  return (
    <div className={`flex ${messages.length > 0 ? `block` : `hidden`}`}>
      <button
        title="Replay audio response"
        disabled={!savedAudio}
        onClick={() => audioRef.current && audioRef.current.play()}
      >
        <Image src="/play.svg" alt="Plus Icon" width={40} height={24} priority />
      </button>
      <button
        title="Start new chat"
        onClick={clearMessages}
        className="p-2 border-white text-black"
      >
        <Image src="/plus.svg" alt="Plus Icon" width={40} height={24} priority />
      </button>
      <audio ref={audioRef} controls className="mb-2 hidden" />
    </div>
  );
}
4️⃣: In the /app/components/chatInput.tsx file, add the code below.
import type { ChatInputProps } from "@/app/types/chat";

export default function ChatInput({ input, setInput, loading, sendMessage }: ChatInputProps) {
  return (
    <form onSubmit={sendMessage}>
      <label className="hidden" htmlFor="message">
        Enter your message here:
      </label>
      <input
        id="message"
        name="message"
        value={input}
        placeholder="What's on your mind?..."
        onChange={(event) => setInput(event.target.value)}
        className="w-56 md:w-72 lg:w-96 p-4 border-2 text-white bg-transparent focus:outline-none"
      />
      <button
        type="submit"
        title="Send message"
        disabled={input.trim() === "" || input.trim().length < 5}
        className="w-24 md:w-24 lg:w-auto px-4 lg:px-8 py-4 border-2 border-white bg-white text-black"
      >
        {loading ? <p className="animate-spin">⏳</p> : "Ask Siri"}
      </button>
    </form>
  );
}
Now visit http://localhost:3000/chat to view the finished and functional UI. The screenshot below shows a breakdown of the four (4) components in different parts of the chat page.
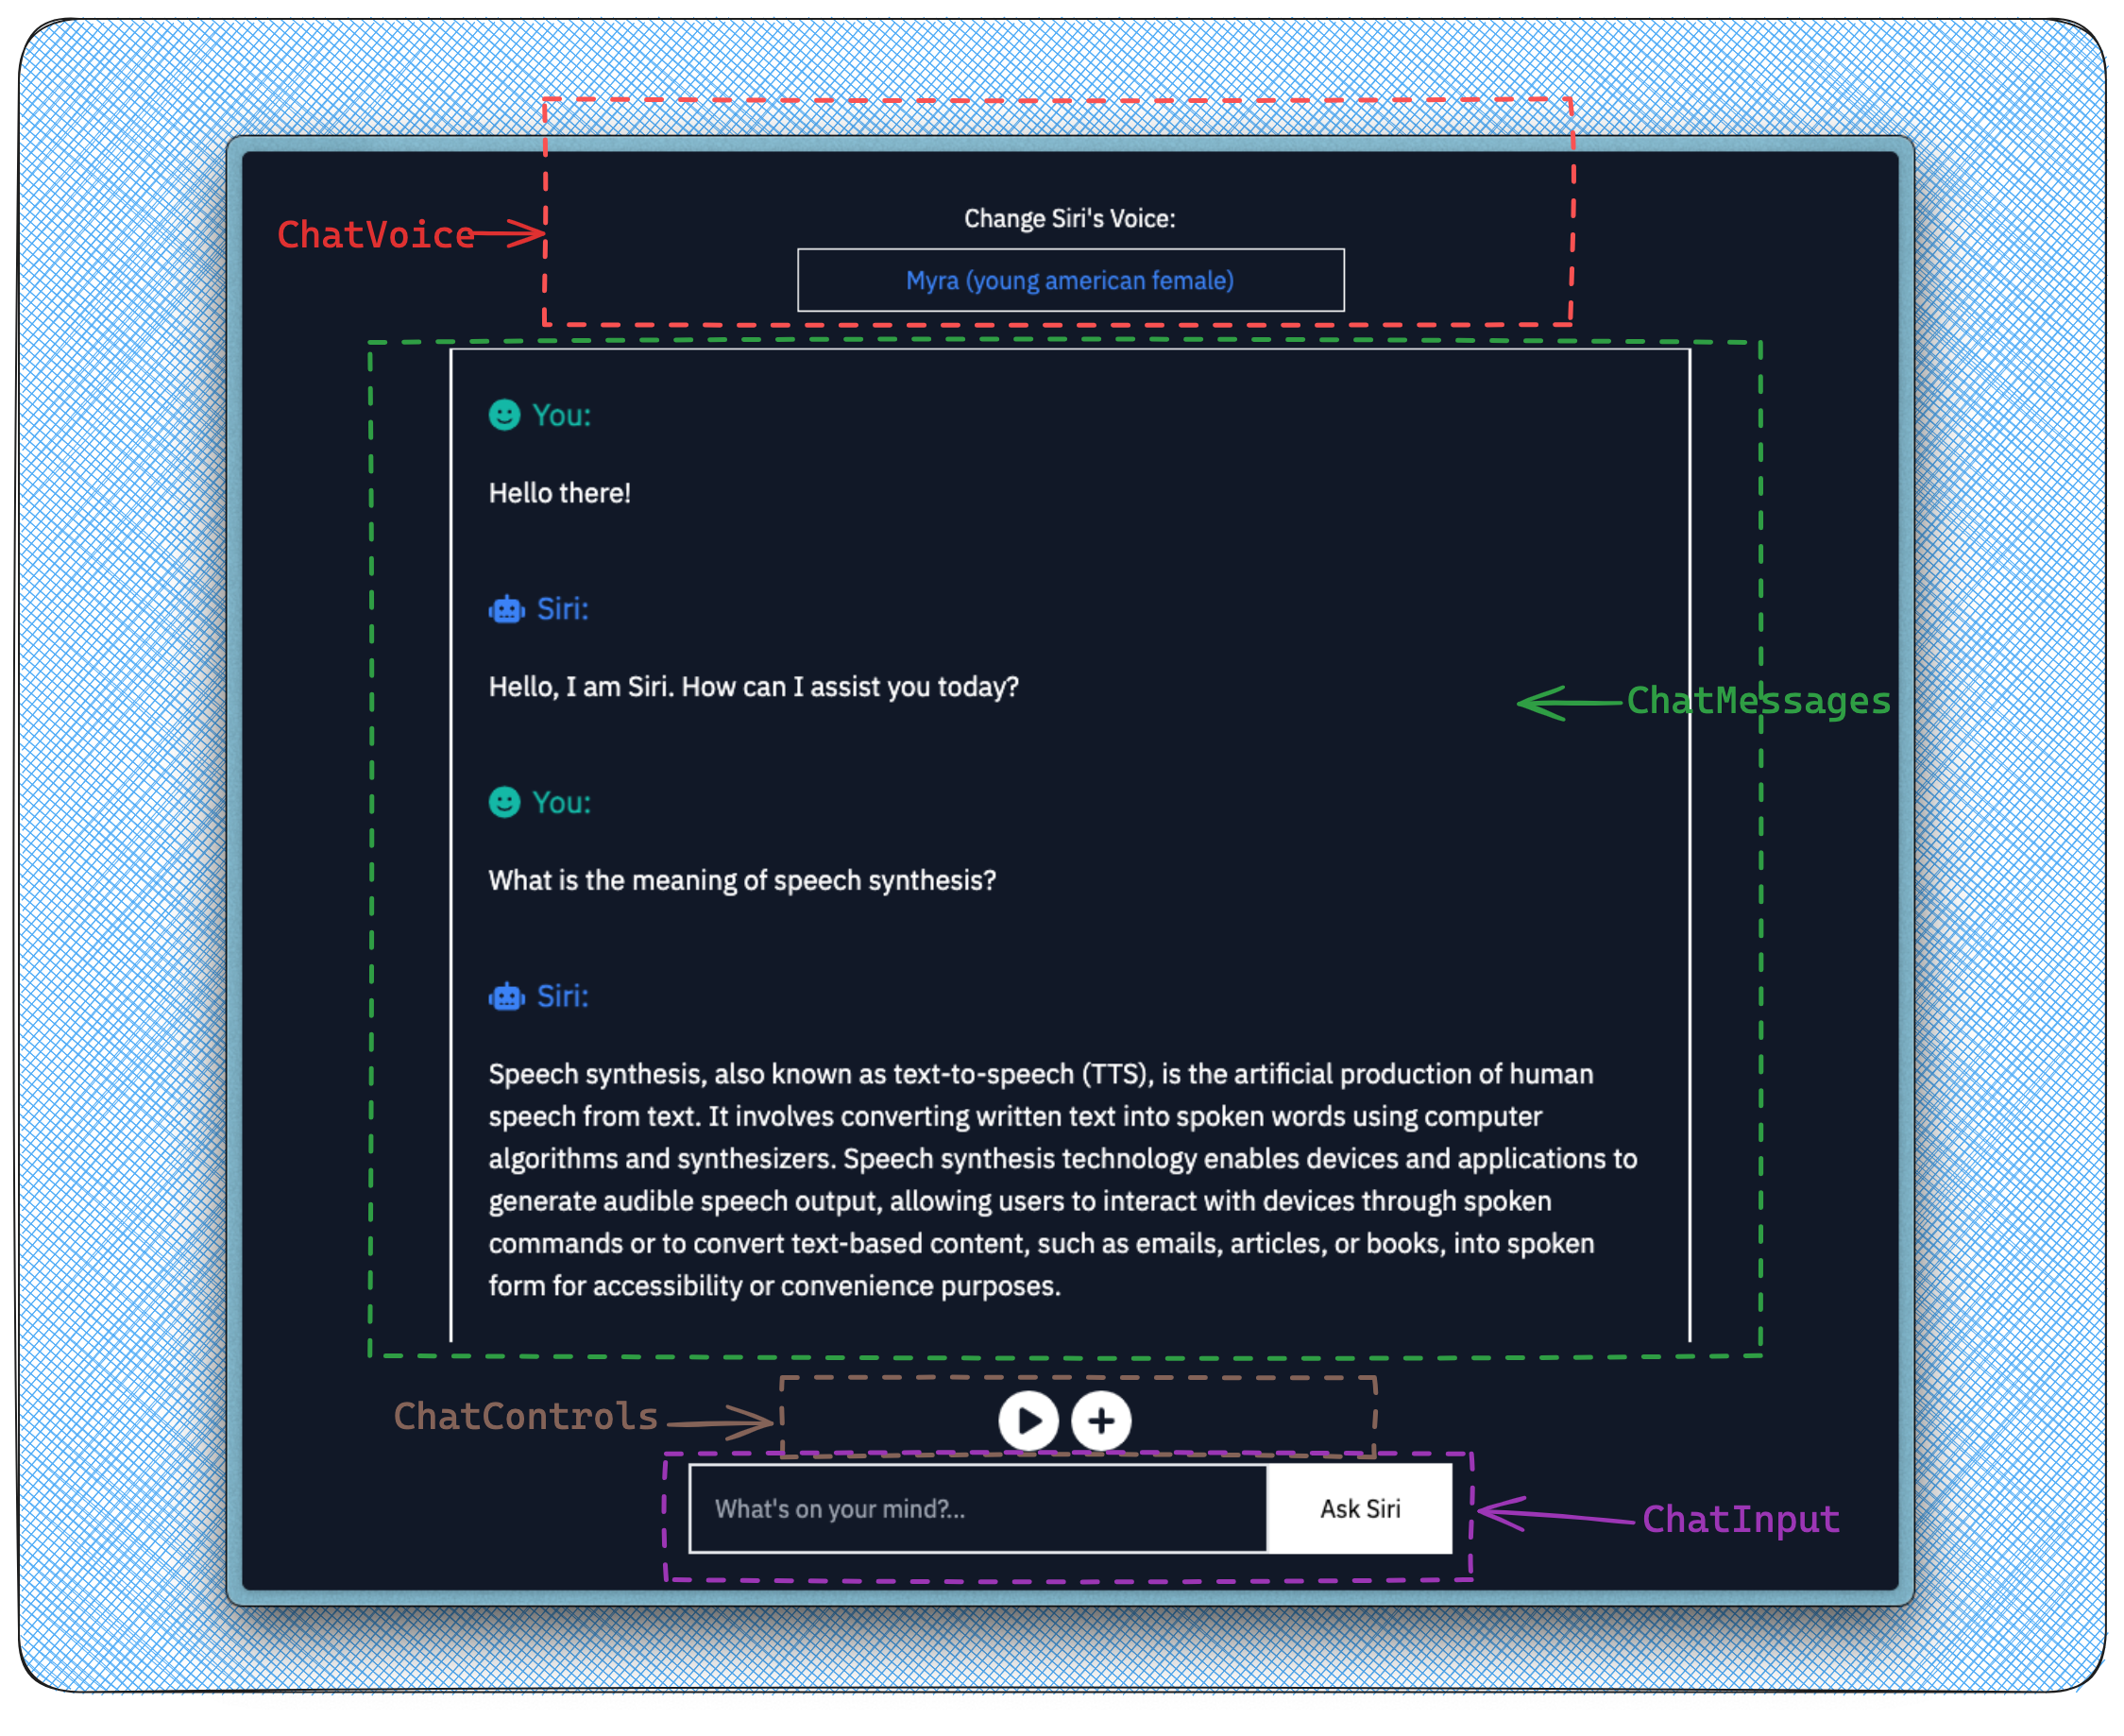
In summary, a user can:
Ask a question by text and get a text and audio response.
Change the voice of the audio response (40+ options).
Start a new chat session (the plus button).
Replay the last audio response (the play button).
Here’s a quick video where I demoed the finished application and quickly walked through all the moving parts of the code:
There are a couple of things we can improve in this demo. If your users will be generating responses with a long amount of text, there would be increased latency and some delay before the final audio response is delivered, especially since we have to wait for OpenAI to respond with the full text and then ElevenLabs with the complete audio. A common solution to building conversational UIs like this is streaming the responses. Streaming allows you to receive the responses in chunks and send them to the UI bit by bit, offering a better loading user experience. Both OpenAI and ElevenLabs support streaming. We can then use Server Side Events (SSE) or Websockets to process the chunks of data returned during streaming.
In a future tutorial, I will explain how to extend this demo to support streaming. In that version, we should be able to stream the response from OpenAI and pass the chunks of the stream to ElevenLabs, leading to reduced latency. For now, take some time to study how Server Side Events and EventSource Web API work, just like I would be doing. Vercel has also built an AI SDK you can use to build conversational streaming user interfaces in both JavaScript and TypeScript. The SDK supports multiple frontend frameworks, and they have example templates for different LLM providers (they call them adapters). With their SDK, you can use some wrappers to build the streaming logic without bothering about the underlying moving parts.
For now, I used the ElevenLabs eleven_turbo_v2 model since I’m working with just the English language, and it’s more suitable for tasks demanding low latency like ours (you can read this guide to learn more) and intentionally set the max_tokens OpenAI parameter to 100. I also added a hack in the OpenAI prompt to reduce the number of characters returned like so:
  messages.map((message: Message) => {
    if (message.role === "user") {
      message.content = `Imagine you are Siri, Apple's digital assistant
and a user asks you the question: "${message.content}".
Kindly generate a suitable response with less than 100 characters.`;
    }
  });
This way, we reduce the response time, and I also get to maximize API credits 😉. For this demo, this works fine, and GPT will respond to every question with the best response that fits into a hundred characters. Thank you for reading this far! Don’t forget to share this article and give the finished project a star.
So far, we’ve built a simple chatbot using Nextjs App Router, OpenAI, and ElevenLabs. If this is your first time doing this, I’m sure you have learned quite some new things. There’s so much more you can experiment with this, and I’m looking forward to seeing them (please leave a comment if you want). You can now go ahead and fork the project, extend the features for your own ideas, or even contribute to the code.
To learn more about each of the tools we used in this tutorial, kindly take a look at the following helpful resources. I’m sure you’d love them.
| Nextjs | OpenAI | ElevenLabs |
| nextjs.org/docs - learn about Next.js features and API. | beta.openai.com/docs - learn about OpenAI's API features. | docs.elevenlabs.com - learn about ElevenLabs' Text-to-Speech API features and API. |
| nextjs.org/learn - an interactive Next.js tutorial. | openai-node - the official Node.js/Typescript library for the OpenAI API. | elevenlabs-js - the official JavaScript library for ElevenLabs Text to Speech API. |
| react.dev/learn - the official React.js documentation. | sdk.vercel.ai - an open-source library designed to help developers build conversational streaming user interfaces in JavaScript and TypeScript. | elevenlabs-python - the official Python library for ElevenLabs Text to Speech API. |