


As earlier stated in my previous article ES6 modules is a very powerful concept. Although support is not available everywhere yet, a common way of using it is to transpile into ES5. You can use Grunt, Gulp, Webpack, Babel or some other transpiler to compile the modules during a build process.
In this article, I’d guide through an introduction to transpiling ES6 with babel and bundling your modules with Browserify. This guide will cover basic installations and configurations.
Let's roll :)
Introducing Babel
Babel is a free and open-source JavaScript compiler and configurable transpiler which is commonly used for transpiling ES6.
Babel was created by Sebastian McKenzien JavaScript Developer @facebook in September of 2014. It was originally called 6to5 but was later renamed to Babel. With the release of Babel 6, the focus turned more towards making Babel pluggable. The default action for Babel in version 6 is not to transform your ES6 to ES5 anymore, but towards making Babel pluggable (Allows you to create plugins to transform your code) so you now have to include various presets. The latest release is Babel 7
Babel has support for the latest version of JavaScript through syntax transformers. These plugins allow you to use the new syntax, right now without waiting for browser support.
How Babel works
Things you should know!
Transpilers, or source-to-source compilers, are tools that read source code written in one programming language and produce the equivalent code in another language. (Wikipedia)
NPM is a package manager for JavaScript with a huge listing of reusable code modules and packages. You can specify all of your project’s dependencies inside your
package.jsonfile, then any time you (or anyone else) needs to get started with your project they can just runnpm installand immediately have all of the dependencies installed.local packages are installed in the directory where you run,
npm
install<package-name>
and they are put in thenode_modulesfolder inside this directory [You must install in the project directory].global packages are all put in a single place in your system (exactly where depends on your setup and OS), regardless of where you run
npm install -g
<package-name>
[You can install anywhere].
In general, all packages should be installed locally, there are two primary reasons for this.
- Different projects on the same machine can depend on different versions of packages allowing you to update one at a time.
- It means you do not have an implicit dependency on the environment you are working in. Making your project far more portable and easier to set up.
A package should be installed globally when it provides an executable command that you run from the shell (CLI), and it’s reused across projects. e.g
create-react-app,nodemonnpme.t.c
This guide would be split into five parts:
- Installing Babel CLI
- Setting up Babel Presets
- .babelrc Configurations
- NPM Scripts Configurations
- Installing Babel for Browser (Browserify & Parcel)
Starter files
For testing purposes, create these files in the right structure as shown below:
.
├── public
│   └── index.html
├── src
│   └── app.js
│   └── math.js
Tip: you can create files in the command line by running
touchfollowed by the file name + extension i.etouch app.js
Installing Babel CLI
- Before we proceed, you need to install Node.js
Head here, download and install the latest version for your Operating system.
To confirm if node.js is installed properly,
     node -v
    // should return the version the installed
    // v10.13.0
- Next, you need to generate your
package.jsonfile.
All npm packages contain a file, usually in the project root, called
package.json- this file holds various metadata relevant to the project. This file is used to give information tonpmthat allows it to identify the project as well as handle the project's dependencies. Source
npm init
This will walk you through a few questions like what is the name of your
project, version, description, etc. When it asks you about the “entry point”,
you can leave it as app.js for now. Typically this is the primary entry point
to your program.
Read npm docs for a full guide on setting up your
package.json
Once you’re done with this, your package.json file should be created now in
your project root.
Now let's install Babel CLI (NB: we’re installing locally)
There are several tools for installing Babel, Babel CLI is a common and recommended built-in method that works on the command line. Othertools can be found here.
npm install --save-dev @babel/core @babel/cli
This might take a while pending on your network strength.
After running this, three things should happen
— You should have a new subfolder in your project root node_modules (This is
where all packages are installed)
— Your package.json should have some new entry
    "devDependencies": {
    "@babel/cli": "^7.2.3",
    "@babel/core": "^7.2.2"
    }
— You should have a new file also package-lock.json (This files basically
stores all information about the newly installed packages, so if someone else
would want to work on that project, they could npm insatll and get the same
dependencies on their machine.
Setting up Babel Presets
As mentioned earlier, Babel does not transpile to ES6 by default. We have to include some plugins. To start, you can use the env preset, which enables transforms for ES2015+
npm install @babel/preset-env --save-dev
Now your package-lock.json should be updated with more dependencies
.babelrc Configurations
.babelrc is the configuration file used to manage your presets and plugins
touch .babelrc
- Inside the created file, add this:
{
 "presets": ["@babel/preset-env"]
 }
Basically, this tells babel to use the env-preset you installed earlier. This
configuration might change depending on your setup
Some Online Editors automatically run Babel for you: JSFiddle, JSBin, Codepen.
Folder Structure
At the end of all this, your folder structure should look like this:
.
├── node_modules
├── public
│   └── index.html
├── src
│   └── app.js
│   └── math.js
├── .babelrc
├── package.json
├── package-lock.json
NPM Scripts Configurations
Now let’s setup NPM to run babel on the CLI
- In your
package.json, there is a section called"scripts"This holds various commands to be performed on your project. Some common commands are:start,build,teste.t.c
"scripts": {
 // some commands here
},
A list of all commands can be found here
- Now add this to the script section
"scripts": {
  "build": "babel src -d public"
},
Adding the above to our package.json in the scripts section will take our
code from src, run it through Babel, and output the file in public .
NB: Scripts are written as JSON objects, if you have multiple commands, seperate them with a comma.
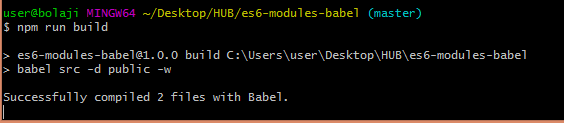
A common practice is to set up watching.
Watching simply listens for file changes and automatically transpiles.You don’t need to run the command everytime you make a change.
edit your build script and add -w or -watch
    "scripts": {
    "build": "babel src -d public -w"
    },
Let’s test Babel
Let’s use the files from my last tutorial
In src/math.js , add this
let sumAll = (a, b) => {return a + b;}
 let subtractAll = (a, b) => {return a - b;}
 let divideAll = (a, b) => {return a / b;}
 let multiplyAll = (a, b) => {return a * b;}

 export default {sumAll, subtractAll, divideAll, multiplyAll};
In src/app.js , add this
import math from './math.js';

 console.log(math.sumAll(50, 10));
 console.log(math.subtractAll(50, 10));
 console.log(math.multiplyAll(50, 10));
 console.log(math.divideAll(50, 10));
To test this code, add src/app.js to the index.html
<script type="module" src="../src/app.js"></script>
Open the HTML and view console, you should get
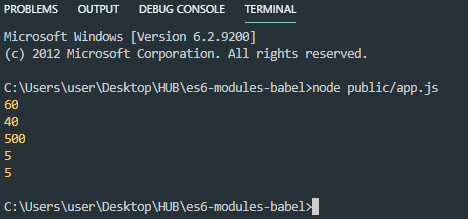
60 40 500 5
Now let's reset out script path to the transpiled JavaScript
<script src="./app.js"></script>
To begin Babel transpiling, run:
npm run build
Now Babel has done its magic;
public/app.js should look like this now, It is now ES5 and cross-browser
compatible
Also, public/math.js should look like this:
Now, If you run your HTML, you’d get this error in the console;
Uncaught ReferenceError: require is not defined
This is because in app.js our import statement is transpiled into ES5 and it
becomes require ;
var math = _interopRequireWildcard(require("./math.js"));
Browsers don’t have the require method defined, but Node.js does.
If you run app.js in node, you will get the right results;
Open your CLI and run
node public/app.js
So basically using Babel for Vanilla JavaScript is overkill, you would run into errors. Babel is mostly used with Node or frameworks like React and Angular.
A great way to work with Babel in the browser is to use code bundlers such as browserify, webpack, parcel etc.
Module bundlers are used to bundle several modules into one or more optimized bundles for the browser. This lets you use require(‘modules’) in the browser by bundling up all of your dependencies.
Working with Browserify
npm install -g browserify
Install the uniq module with npm:
Uniq removes all duplicates from an array in place. More details here
npm install uniq
Now recursively bundle up all the required modules starting at app.js into a
single file called bundle.js with the browserify command:
browserify app.js -o bundle.js
Add to your HTML:
<script src="bundle.js"></script>
Working with Parcel
Parcel is a web application bundler, differentiated by its developer experience. It offers blazing fast performance utilizing multicore processing, and requires zero configuration. source
To install:
npm install parcel-bundler --save-dev
Parcel can take any type of file as an entry point, but an HTML or JavaScript file is a good place to start.
Modify your scripts in package.json
{
  "scripts": {
    "dev": "parcel .src/index.html",
    "build": "parcel build .src/index.html"
  }
}
To run in development mode:
Now open http://localhost:1234/ in your browser. Everything should log correctly now.
To build for production
npm run build
You’d get a new subfolder dist which contains your bundled files, here you
won’t need public subfolder anymore, you can delete it.
Read Parcel docs for a complete and deep guide to all the features of Parcel.
Conclusion
Babel is a toolchain that is mainly used to convert ECMAScript 2015+ code into a backwards compatible version of JavaScript in current and older browsers or environments.
Here are the main things Babel can do for you:
- Transform syntax
- Polyfill features that are missing in your target environment (through @babel/polyfill)
- Source code transformations (codemods)
- And more! (check out these videos for inspiration)
Please read Babel docs for a complete and deep guide to all the features of Babel.
A great way to work with Babel in the browser is to use code bundlers such as browserify, webpack, parcel etc.