

How to Build and Deploy a Progressive Web App with PWAFire, GitHub Pages, and Firebase


Recently I discovered a new trend, a powerful web technology, one that every Web Developer should know, yeah I said every!
I first heard about PWA’s a few months back, and at first, it was weird trying to understand the concept and then trying to learn it. I stumbled on a link that led me to PWAFire an Open Sourced framework that helps you to Build Scalable Progressive Web Apps/First Experiences.
I started out by reading what PWA really means and why I should learn it. After understanding the entire concept, I decided to dive in.
As a Developer, one skill you should possess is “Learning”. What you knew yesterday might be obsolete today. It happens on the web from time to time that powerful technologies come to exist, if you are still behind, you’d miss out on this evolution.
So you should have heard of PWA or Progressive Web Apps and you probably might be wondering what this really means?
Basically a Progressive Web App is a mobile website that can perform super-fast and behave just like a mobile app.
A Progressive Web App (PWA) is a web app that uses modern web capabilities to deliver an app-like experience to users.
Now let's break this down!
Let's break the word Progressive Web App;
Progressive: happening or developing gradually or in stages.
Web: A common name for the World Wide Web, a subset of the Internet consisting of the pages that can be accessed by a Web browser.
App: An application, especially as downloaded by a user to a mobile device
Let's merge all this definition; a subset of the Internet consisting of the pages that can be accessed by a Web browser, happening or developing gradually or in stages and can be downloaded by a user to a mobile device.
To wrap up; A progressive Web App is a modern web application built with a number of specific technologies and standard patterns which allow them to take advantage of both web and native app features.
PWA helps us to build Cross-platform web apps (Works on the web, Android, iOS and Desktop)
Progressive Web Apps are installable and live on a user’s home screen, without the need for an app store. They offer an immersive full screen experience with help from a web app manifest file and can even re-engage users with web push notifications.
What does a Progressive Web App Looks Like?
When you visit a website with PWA, It pops up with a notification telling you to add the website to your home screen. This is just like downloading an app from the App Store or Play Store.
I would be showing you shots from Netty-Finder a little project I built, you can contribute here.
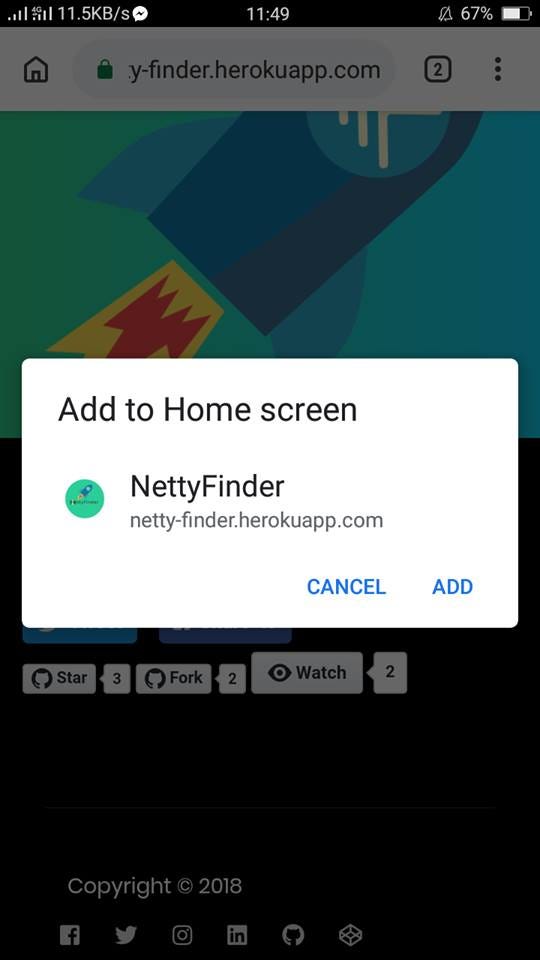
Once you’ve clicked ADD, the website is then installed on your device and yes it acts like a mobile app.
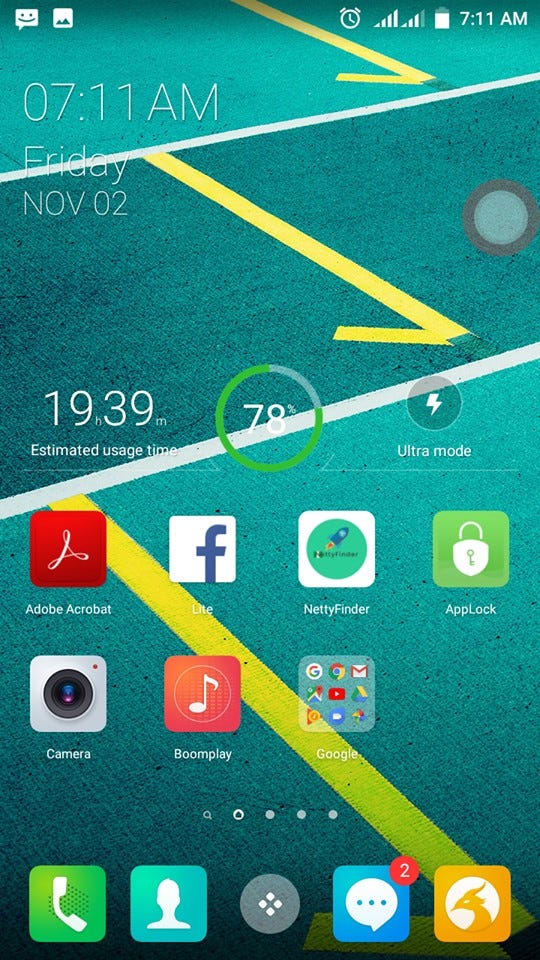
You can uninstall it and share it; basically you use it as a normal Mobile App. Cool right?
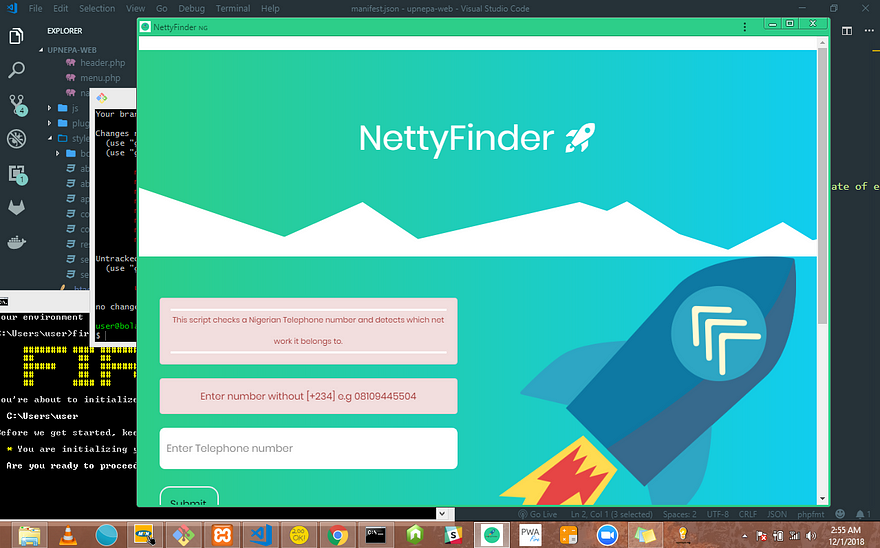
PWA’s can also be installed on Android, iOS and Desktop.
Here’s how it looks on Desktop
Why build a Progressive Web App?
So why should you build a PWA?
Building a high-quality Progressive Web App has incredible benefits, making it easy to delight your users, grow engagement and increase traffic.
- they’re installable — if a user visits your website for the second, third, or fourth time, they get the option of adding it to their home screen. After that, it’s still linkable and therefore shareable via URL.
- they’re indexable — your app is visible in the browsers and so it’s searchable for users.
- they work offline — once you download it to your device, you can cache contents from the app without an Internet connection. Your users will never see the running downasaur :)
- they can send push notifications — once a new article/product/piece of news shows up on your website, your users will be notified just like every mobile app out there.
- they cut down page load times — as proved by housing.com, PWAs can significantly reduce page load times and thus improve overall UX.
- they’re progressive — they will work for any user on any device, even with a poor Internet connection.
The benefits of Progressive Web Apps are enormous — you can check more on Google Developers Docs.
The three basic criteria for a PWA
The three baseline criteria a website must fulfil in order to qualify as a Progressive Web App are:
You need to be running under HTTPS.
You need a Web App Manifest.
You need a Service Worker.
Now, let's move to the Codelab section :)
Codelab Flow
- What we shall do in this codelab
- Download Demo Project
- Starter guide
- Setup Service Worker
- Setup Web Manifest
- Configure Service Worker
- Configure Web Manifest
- Firebase Hosting
- GitHub Pages Hosting
- What's next
What to do
We are going to convert a basic static site into a Progressive Web App.
Make sure to follow all the steps as documented later below.
Download the project template. Unzip the downloaded file to your preferred location after download.
If you are using GitHub Desktop, simply
Fork and
clone it. If you’re using
Git, git clone https://github.com/BolajiAyodeji/code-lab-demo.git
Download Demo Project
This project is a basic app built with HTML, CSS, BOOTSTRAP AND JAVASCRIPT.
The App checks your Date of Birth and detects the Day of the Week you were born. Pretty cool right? 😀
We are going to convert this web app into a Progressive Web App and test it using the PWAFire Checklist
Starter Guide
In your root folder, create two empty files; service-worker.js and
manifest.json and save. Once done; let's proceed down here;
Setup Service Worker
This is the first step to making our web app work offline. Copy and paste this code to the index file just before the end of the body tag or in the head tag.
N/B : YOU NEED HTTPS :
We are going to use Firebase Hosting and GitHub Pages later which shall have HTTPS already provisioned for our project.
First, we need to check if the browser supports service workers, and if it does, register the service worker.
<!-- register service worker -->
        <script>
          if ('serviceWorker' in navigator)
          {
          window.addEventListener('load', function() {
            navigator.serviceWorker.register('/service-worker.js')
            .then(function() { console.log("Service Worker Registered, Cheers to PWA Fire!"); });
          }
          );
        }
        </script>
 <!-- end of service worker -->
Setup Web Manifest
We are going to add a link tag to all the pages that encompass our web app inside the head tag. For our case, we only have one page, the index.html. Add the following code to it.
<!-- start of web manifest -->
<link rel="manifest" href="/manifest.json">
<!-- end of web manifest -->
Configure Service Worker // service-worker.js
A service worker is a script that your browser runs in the background, separate from a web page, opening the door to features that don’t need a web page or user interaction.
NOTE : The important thing to understand about the Service Worker is that you are in control of the network. You get to decide what is cached, how it is cached and how it should be returned to the user.
Follow the steps in the code below, configure to your desired taste :)
/ PWA Fire Bundle

        // after a service worker is installed and the user navigates to a different page or
        // refreshes, the service worker will begin to receive fetch events

        self.addEventListener('fetch', function(event) {
        event.respondWith(caches.open('cache').then(function(cache) {
        return cache.match(event.request).then(function(response) {
        console.log("cache request: " + event.request.url);
        var fetchPromise = fetch(event.request).then(function(networkResponse) {
        // if we got a response from the cache, update the cache
        console.log("fetch completed: " + event.request.url, networkResponse);
        if (networkResponse) {
            console.debug("updated cached page: " + event.request.url, networkResponse);
              cache.put(event.request, networkResponse.clone());}
              return networkResponse;
                  }, function (event) {
        // rejected promise - just ignore it, we're offline!
                  console.log("Error in fetch()", event);
                  event.waitUntil(
                  caches.open('cache').then(function(cache) {
        // our cache is named *cache* in the caches.open() above
                  return cache.addAll
                  ([
        //cache.addAll(), takes a list of URLs, then fetches them from the server
        // and adds the response to the cache.
        // add your entire site to the cache- as in the code below; for offline access
        // If you have some build process for your site, perhaps that could
        // generate the list of possible URLs that a user might load.
                '/', // do not remove this
                '/index.html', //default
                '/index.html?homescreen=1', //default
                '/?homescreen=1', //default
                '/assets/css/main.css',// configure as by your site ; just an example
                '/images/*',// choose images to keep offline; just an example
        // Do not replace/delete/edit the manifest.js paths below
        //These are links to the extenal social media buttons that should be cached;
        // we have used twitter's as an example
              'https://platform.twitter.com/widgets.js',
                ]);
                })
                );
                });
        // respond from the cache, or the network
          return response || fetchPromise;
        });
        }));
        });

        self.addEventListener('install', function(event) {
          // The promise that skipWaiting() returns can be safely ignored.
          self.skipWaiting();
          console.log("Latest version installed!");
        });
Configure Web Manifest // manifest.json
Configuring the manifest.json file helps you to specify how you want your web
app to look like when launched on the device.
You can also use the WEB MANIFEST
GENERATOR to automatically generate your
manifest.json file
{
          "background_color": "#fff",
          "display": "standalone",
          "orientation":"portrait",
          "theme_color": "#fff",
          "short_name": "DOB Finder",
          "name": "Date of Birth Finder",
          "description": "description or purpose of your progressive web app",
          "lang": "en-US",
          "icons": [
          {
            "src": "img/icons/icon-72x72.png",
            "sizes": "72x72",
            "type": "image/png"
          },
          {
            "src": "img/icons/icon-96x96.png",
            "sizes": "96x96",
            "type": "image/png"
          },
          {
            "src": "img/icons/icon-128x128.png",
            "sizes": "128x128",
            "type": "image/png"
          },
          {
            "src": "img/icons/icon-144x144.png",
            "sizes": "144x144",
            "type": "image/png"
          },
          {
            "src": "img/icons/icon-152x152.png",
            "sizes": "152x152",
            "type": "image/png"
          },
          {
            "src": "img/icons/icon-192x192.png",
            "sizes": "192x192",
            "type": "image/png"
          },
          {
            "src": "img/icons/icon-384x384.png",
            "sizes": "384x384",
            "type": "image/png"
          },
          {
            "src": "img/icons/icon-512x512.png",
            "sizes": "512x512",
            "type": "image/png"
          }
          ],
          "start_url": "index.html?launcher=true",
          }
PLEASE NOTE: When using your own logos, ensure that the image has equal width and height preferably (500px x 500px), sizes like 400px x 350px will result in errors! Find more starter guide on PWAFire Web Manifest developer docs available here.
In the head tag, add theme color to all your pages as shown in the code below; You could use the same theme color as in the manfest.json file.
<!-- theme-color -->
<meta name="theme-color" content="#fff" />
<!-- end-theme-color -->
Firebase Hosting
If you’re new to Firebase, you’ll need to create your account and install some tools first.
Create a Firebase account at https://firebase.google.com/console/. Once your account has been created and you’ve signed in, you’re ready to deploy!
Create a new Firebase app at https://firebase.google.com/console/
For this codelab, name the projectDOB Finder and take note of the Project ID
- Install the Firebase tools via npm (run this in your command line).
The Firebase Command Line Interface (CLI) will allow you to serve the web app locally and deploy.
npm -g install firebase-tools
- To verify that the CLI has been installed correctly, open a console and run:
firebase --version
- If you haven’t recently signed in to the Firebase tools, update your credentials:
firebase login
- Make sure you are in the
Date of Birth Finderdirectory
cd Date-of-Birth-Finder
Initialize your app to use Firebase.
Select your Project ID and follow the instructions.
When prompted, you can choose any Alias, such as pwafire for instance. Select
Firebase Hosting as the Firebase CLI feature. Provide the default directory
as /. To the other prompts, reply NO; N
firebase init
- Finally, deploy the app to Firebase:
firebase deploy
- Celebrate. You’re done! Your app will be deployed to the domain:
https://YOUR-FIREBASE-APP.firebaseapp.com
- Visit your web app on your phone now.
You should see an “install to home screen” banner prompt!
Welcome to the new world!! Further reading: Firebase Hosting Guide.
Github Pages Hosting
If you’re new to GitHub, you’ll need to create your account and create a repository first.
Create a GitHub account at https://github.com/signup. Once your account has been created and you’ve signed in, you’re ready to start!
Create a new Repository https://github.com/new named username.github.io, where username is your username (or organization name) on GitHub.
If you created a repository with your username before, don’t worry, just name
the Repository anything, your project would still be hosted on the url
username.github.io/project-name where username is your username (or organization name) on GitHub and project-name is the name of your project repository
For this codelab, name the repositoryDOB Finder
Enable GitHub Pages https://github.com/repository-name/settings, where repository-name is the name of your repository on GitHub.
Scroll down to the GitHub Pages section,Click the NONE Drop down button, Select master branch, Click Save.
Upload your files to your repository
Using GitHub Desktop [Download GitHub Desktop ]
- Clone the repository Click the “Set up in Desktop” button. When the GitHub desktop app opens, save the project. If the app doesn’t open, launch it and clone the repository from the app.*
- Add your files to the cloned repository
- Commit & publish Return to the GitHub Desktop app, Enter the repository, commit your changes, and press the publish button.
Using Git Terminal. [Download here]
Clone the Repository
$ git clone https://github.com/username/username.github.io
Enter the Project folder
$ cd username.github.io
Add your files to the cloned repository folder
Add, Commit and Push your Changes
$ git add -all
$ git commit -m "Initial commit"
$ git push -u origin master
- Celebrate. You’re done! Your app will be deployed to the domain:
- Visit your web app on your phone now. You should see an “install to home screen” banner prompt! Welcome to the new world!! Further reading: GitHub Pages Hosting Guide.
View the Demo App here
What’s next?
Check out the Progressive Web Apps Checklist in this codelab and check if your web app qualified enough to be a called a PWA.
You can also use LightHouse in Chrome Dev Tools to checklist your web app.
Also, PWAFire is an Open Sourced tool built by Maye Edwin that helps you build amazing web experiences by providing you with web.dev guide and tool-kits that helps you build progressive web apps with best web practices. One major aspect of PWAFire I enjoy most is the Codelabs section :)
You can join the build and contribute here
If you still have problems with building your PWA, you can tweet to me @iambolajiayo, I will respond asap!
Thank you for reading, If you did enjoy this article, share!! :)